Microsoft Entra ID
Overview
Microsoft Entra ID (formerly Azure Active Directory) is a cloud-based identity and access management service that provides secure authentication, authorization, and user management services. Entra ID helps organizations manage user identities across Microsoft and third-party applications, providing single sign-on (SSO), multi-factor authentication (MFA), and comprehensive user lifecycle management.
- Vendor: Microsoft
- Product: Microsoft Entra ID
- Supported environment: Cloud
Configure
How to create an app registration with proper permissions
To connect Microsoft Entra ID to Sekoia.io, you need to create an app registration with the necessary permissions to access Entra ID users and groups. Follow these steps:
-
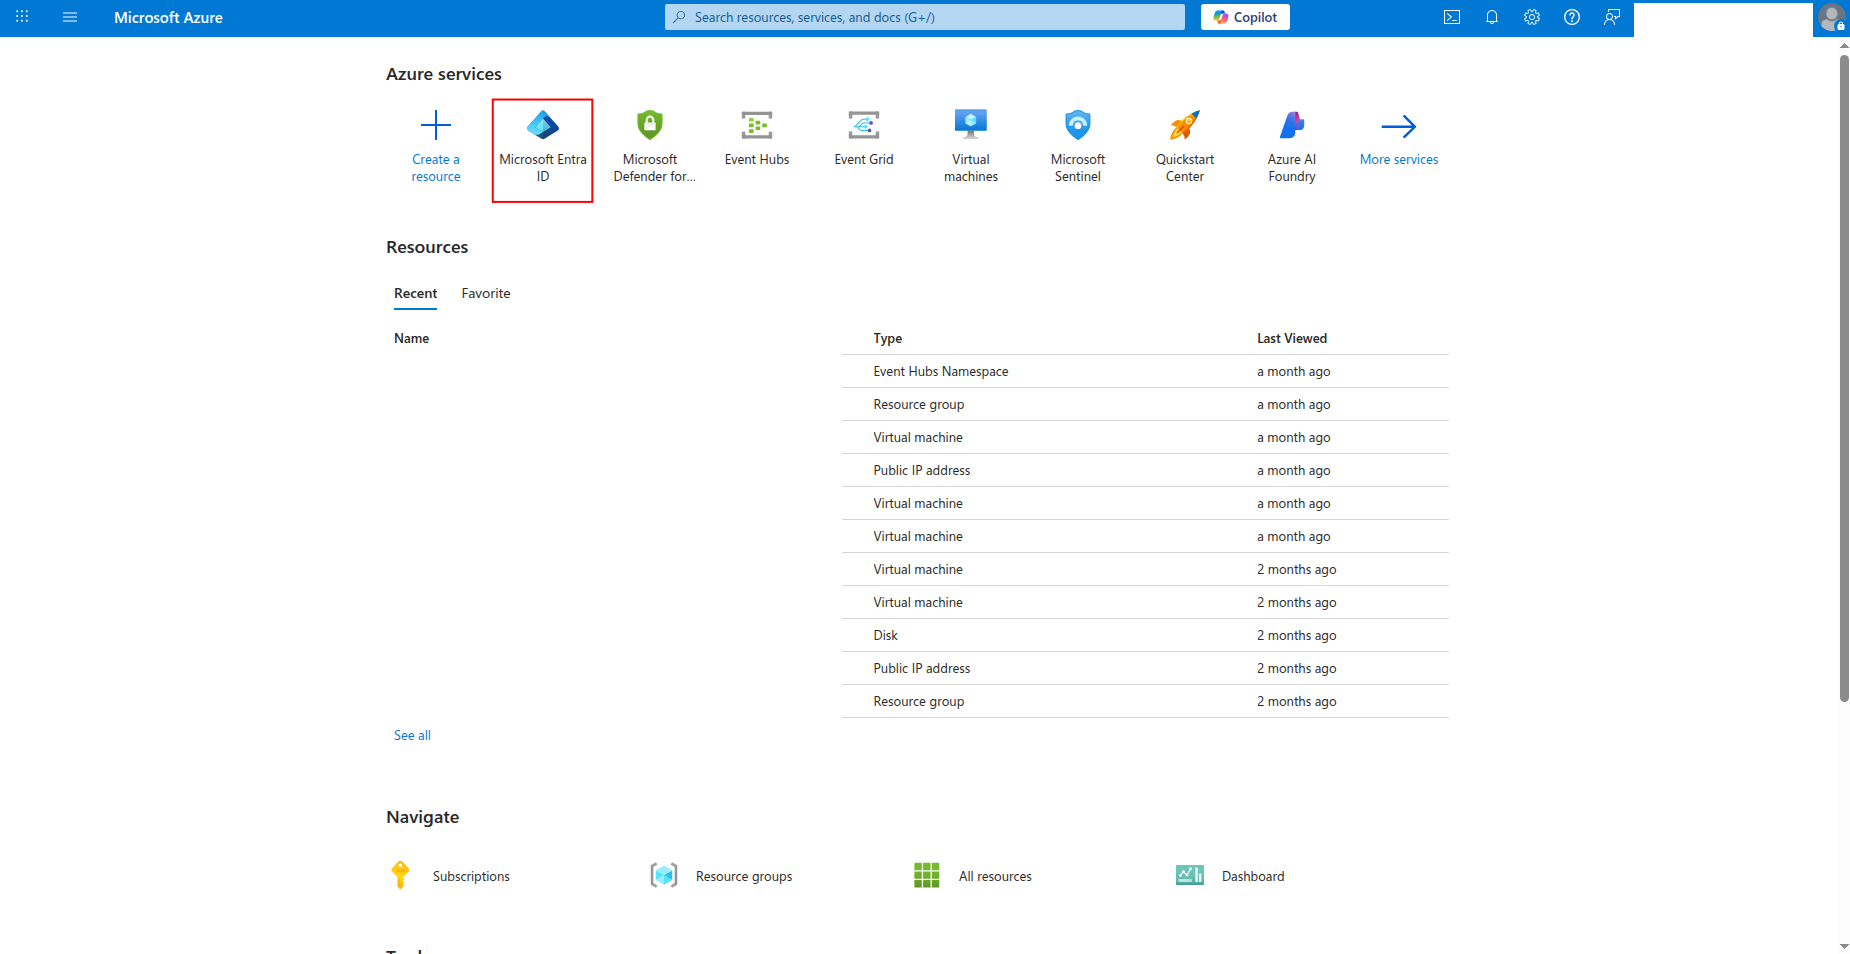
Sign in to the Azure portal and navigate to Microsoft Entra ID.
-
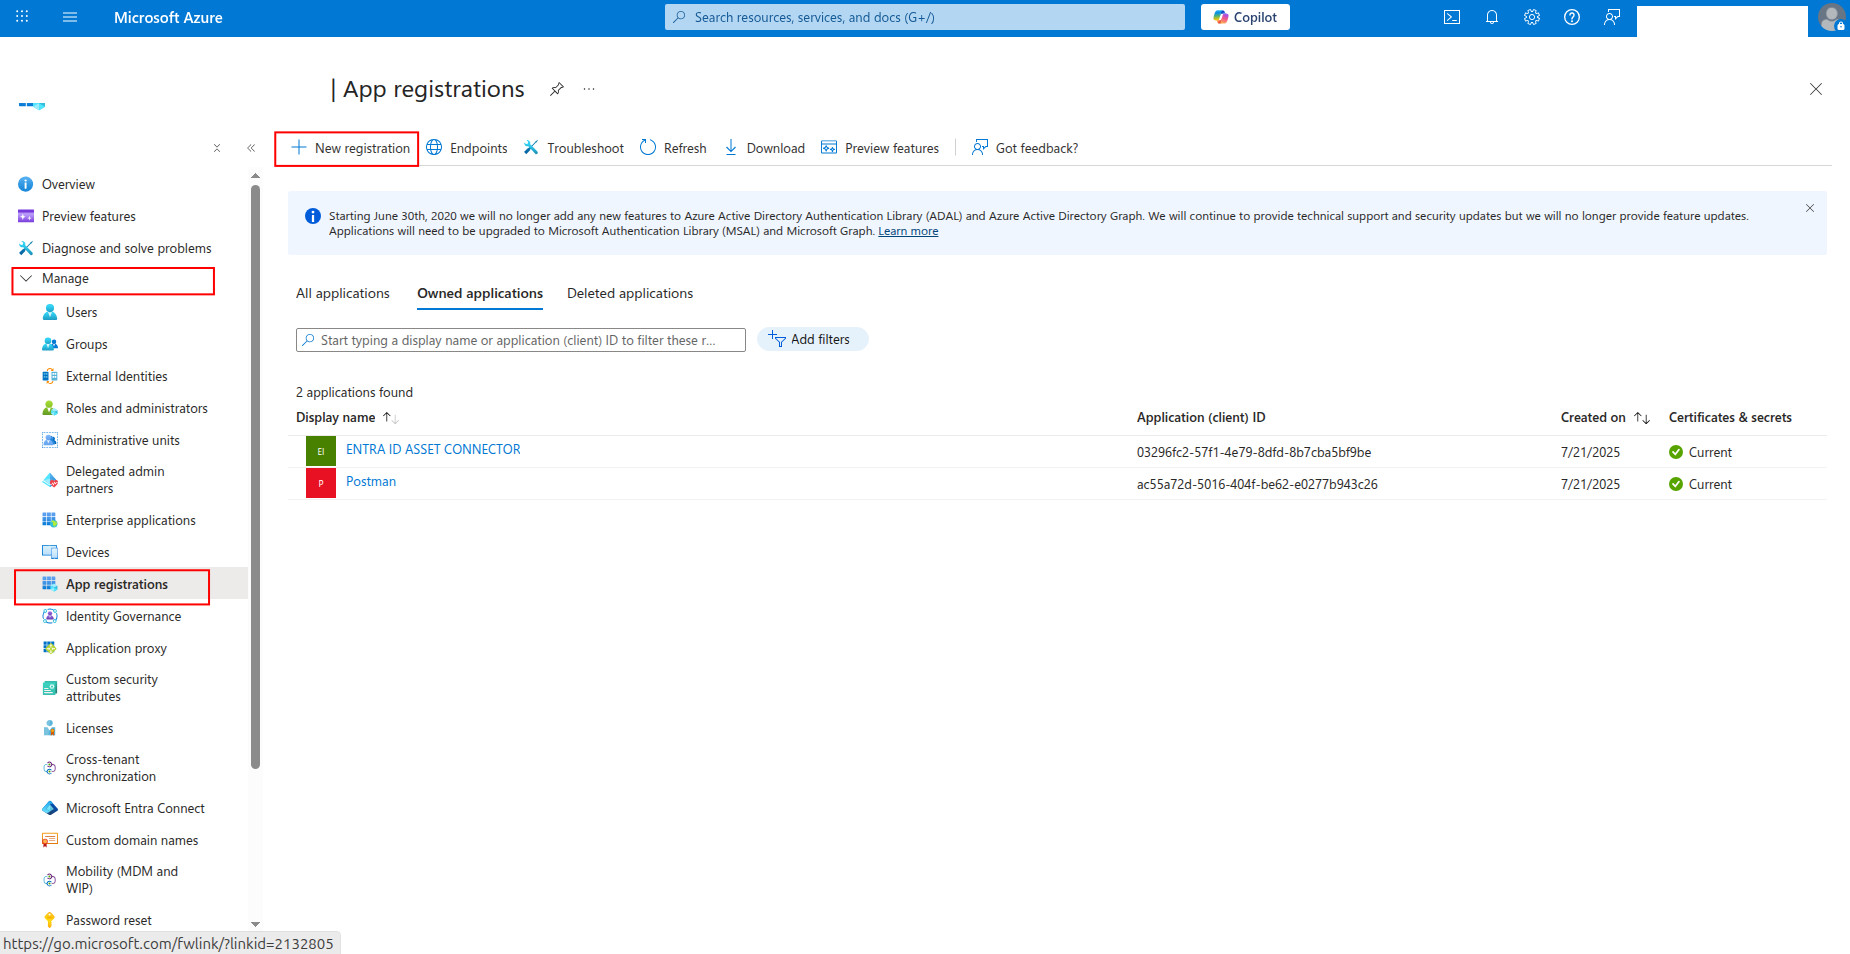
Click App registrations in the left navigation pane, then click New registration.
-
Enter a name for the application (e.g.,
sekoia-user-reader) and click Register.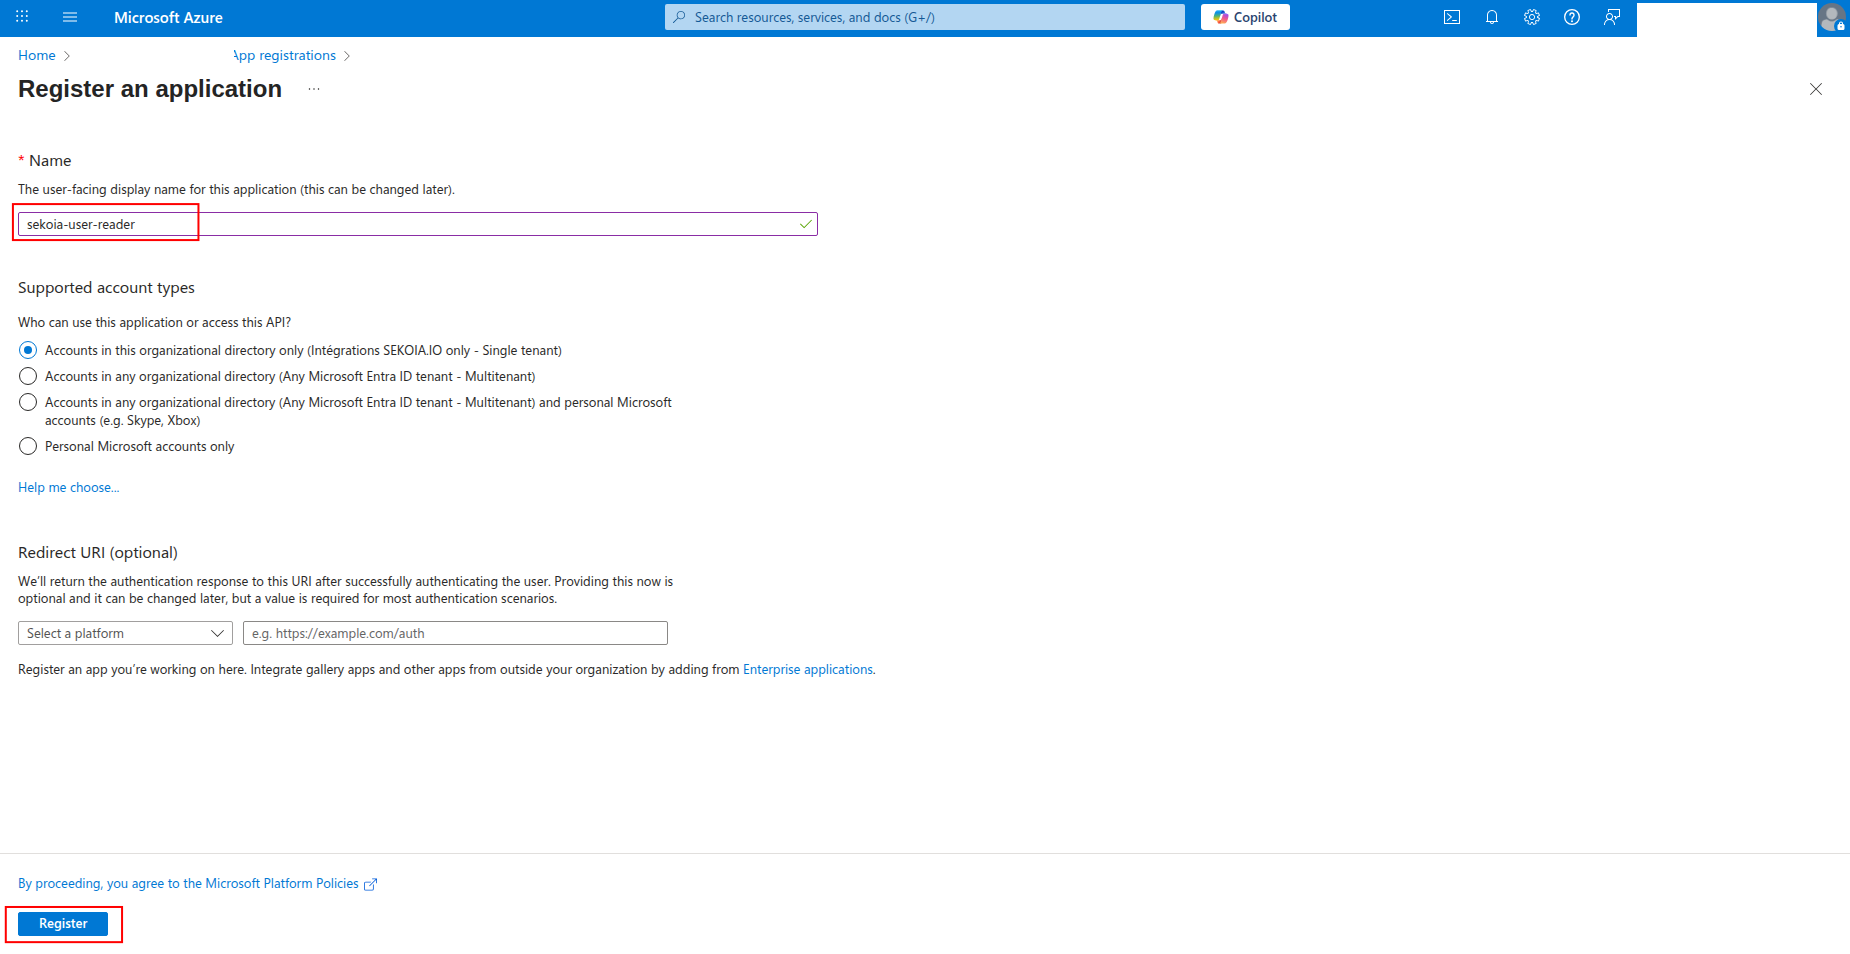
-
Copy the Application (client) ID and Directory (tenant) ID to a safe location. You'll need these values to configure the connector in Sekoia.io.

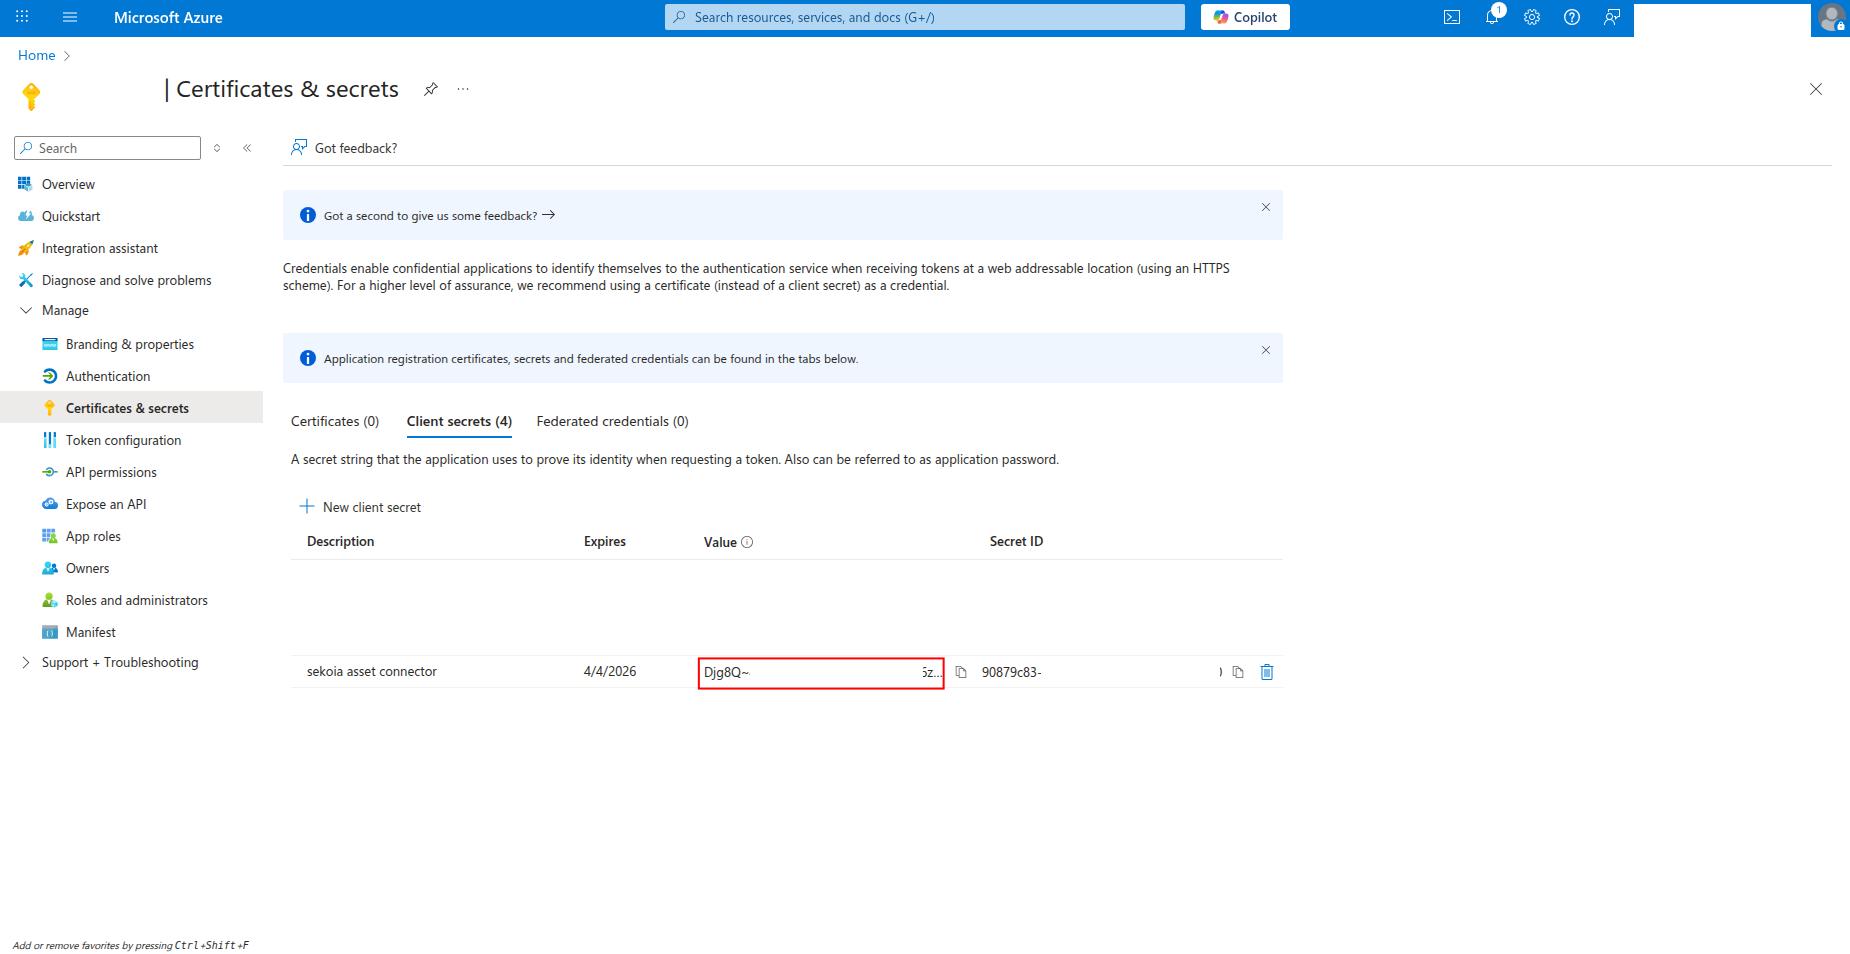
How to generate a client secret
After creating the app registration, you need to generate a client secret for authentication:
-
Click Certificates & secrets in the left navigation pane.
-
Click New client secret to generate a new secret.

-
Enter a description for the secret (e.g.,
sekoia-connector-secret) and select an expiration period, then click Add.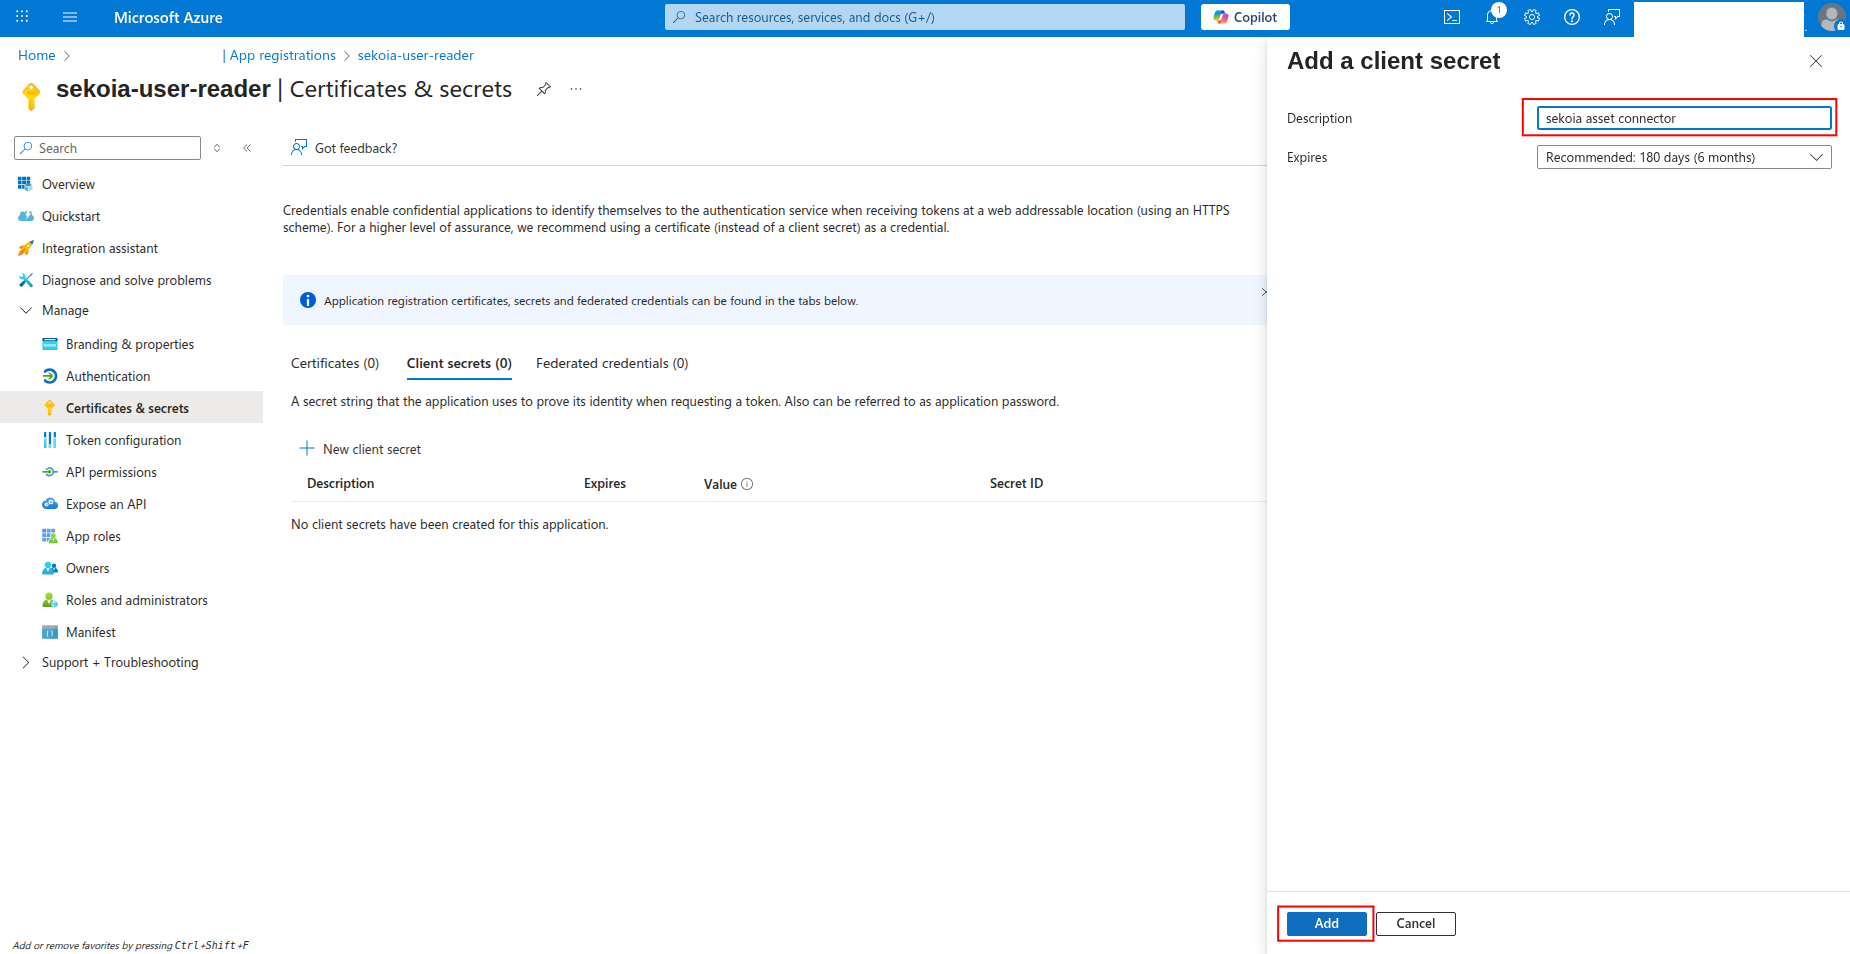
-
Copy the Value of the client secret to a safe location. You'll need this secret to configure the connector in Sekoia.io.
Warning
- The client secret value is only shown when you create it. If you lose it, you must create a new client secret.
- Store this secret securely and never share it publicly.
- Consider rotating client secrets regularly for security best practices.
Required API permissions
The app registration must have the following permissions to successfully fetch Entra ID users and groups:
{
    "permissions": [
        "User.Read.All",
        "Group.Read.All",
        "GroupMember.Read.All",
        "Directory.Read.All",
        "UserAuthenticationMethod.Read.All"
    ]
}
Required Permissions:
User.Read.All: Read user profiles and attributesGroup.Read.All: Read group information and membershipsGroupMember.Read.All: Read group membershipsDirectory.Read.All: Read directory dataUserAuthenticationMethod.Read.All: Read user authentication methods
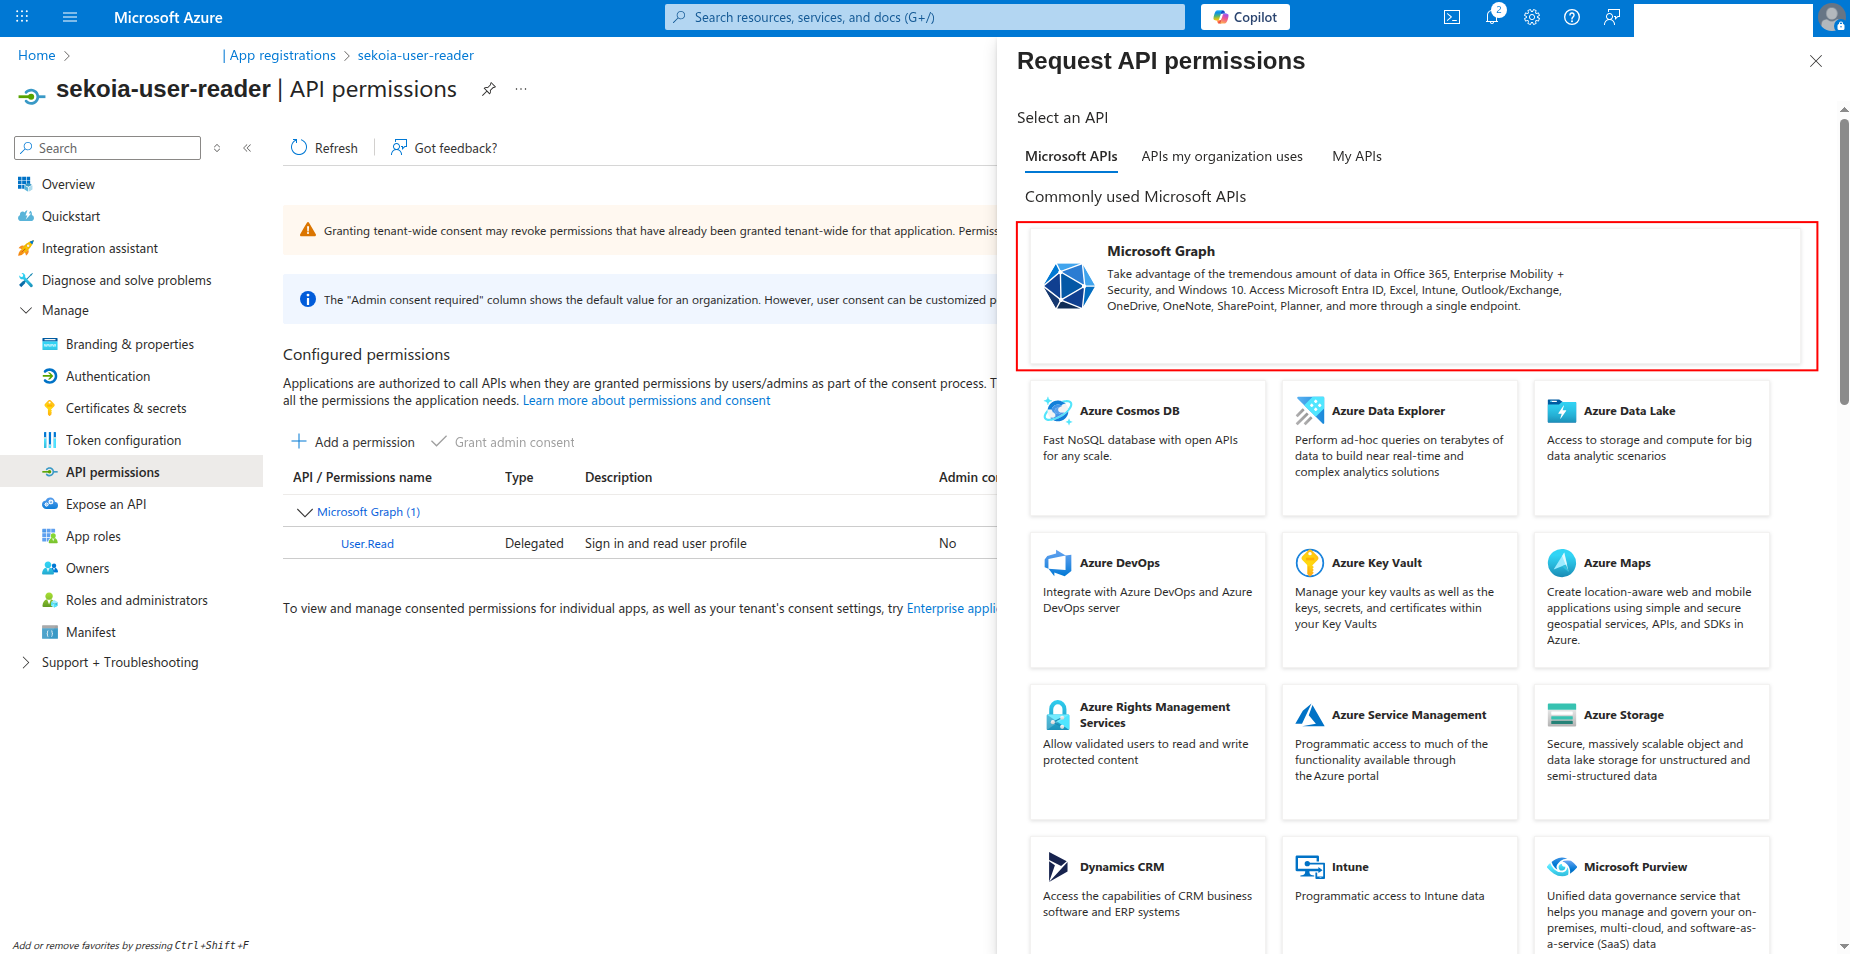
How to grant API permissions
To grant the required permissions to your app registration:
-
Click API permissions in the left navigation pane.
-
Click Add a permission to add new permissions.

-
Select Microsoft Graph as the API.
-
Select Application permissions and search for the required permissions:
User.Read.AllGroup.Read.AllGroupMember.Read.AllDirectory.Read.AllUserAuthenticationMethod.Read.All
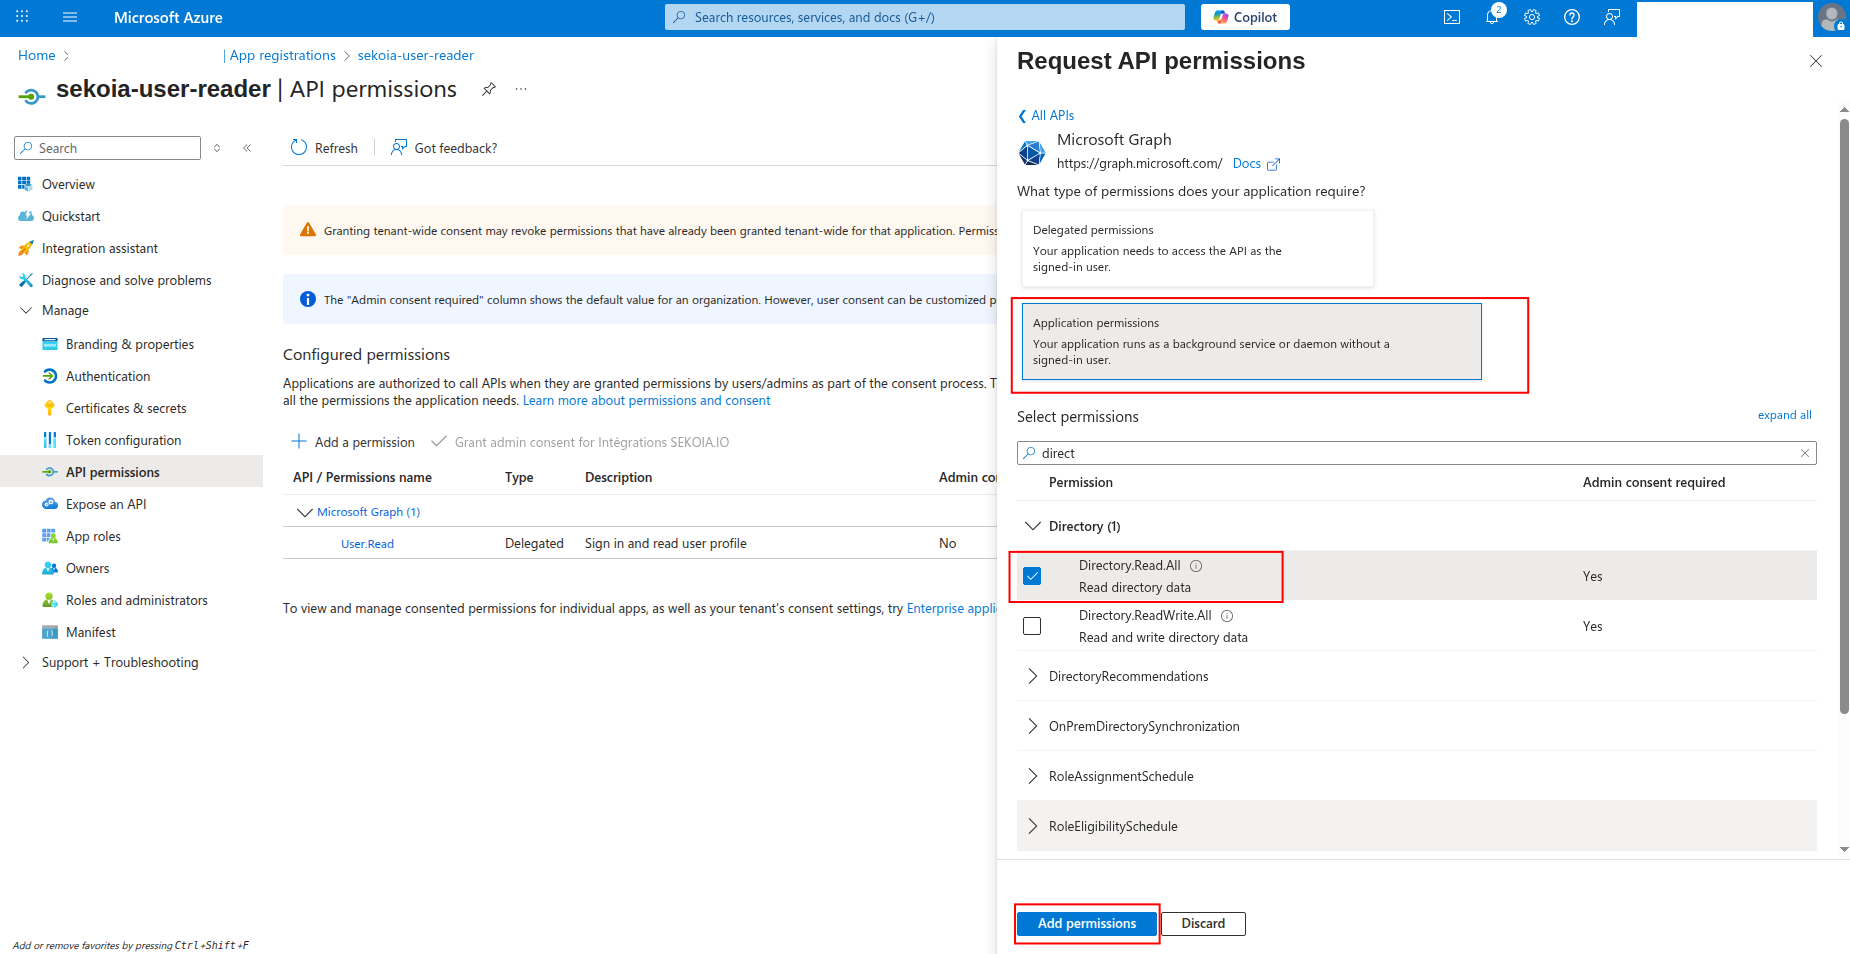
-
Click Add permissions to add the selected permissions.
-
Click Grant admin consent to grant the permissions (requires admin privileges).
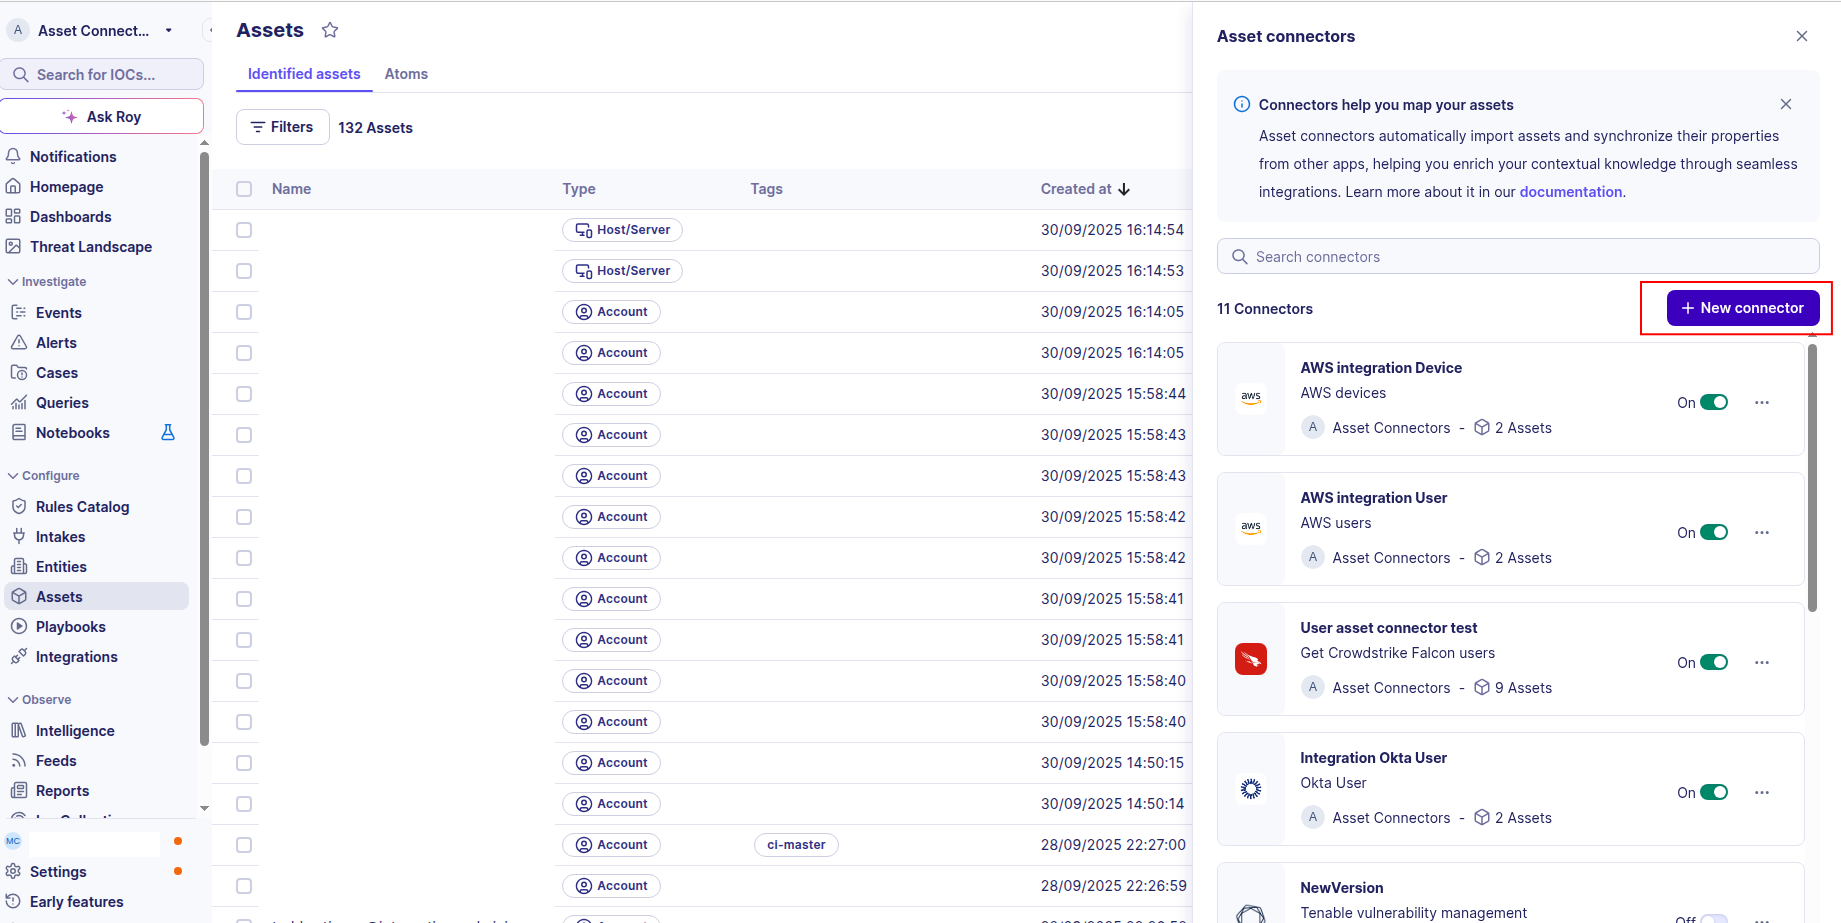
Create your asset
To start getting your Microsoft Entra ID users into Sekoia.io, you need to create an asset connector on the Assets page. To do so, follow these steps:
-
Click the Asset connectors button to create a new connector.
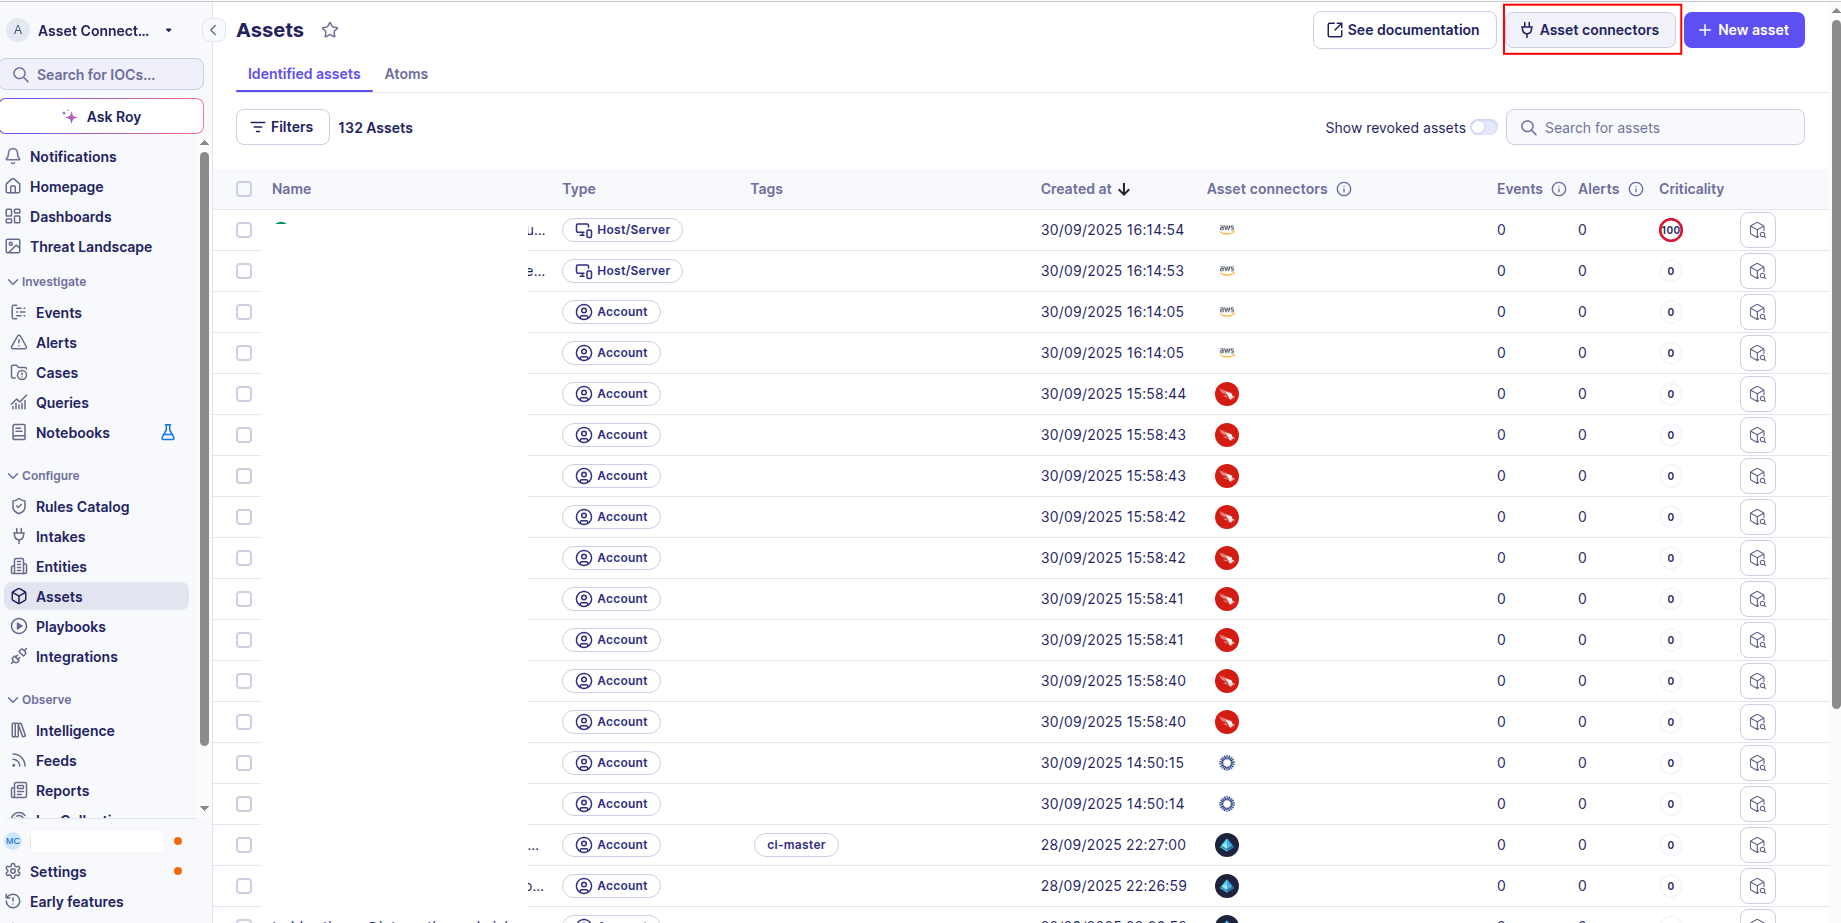
-
Click the + New connector button.
-
Choose Microsoft Entra ID User, give it a name, and fill the required fields:

-
Enter the following information:
- Tenant ID: The Directory (tenant) ID from your app registration
- Client ID: The Application (client) ID from your app registration
- Client Secret: The client secret value you generated
-
Test the connection by clicking the Test connector button.
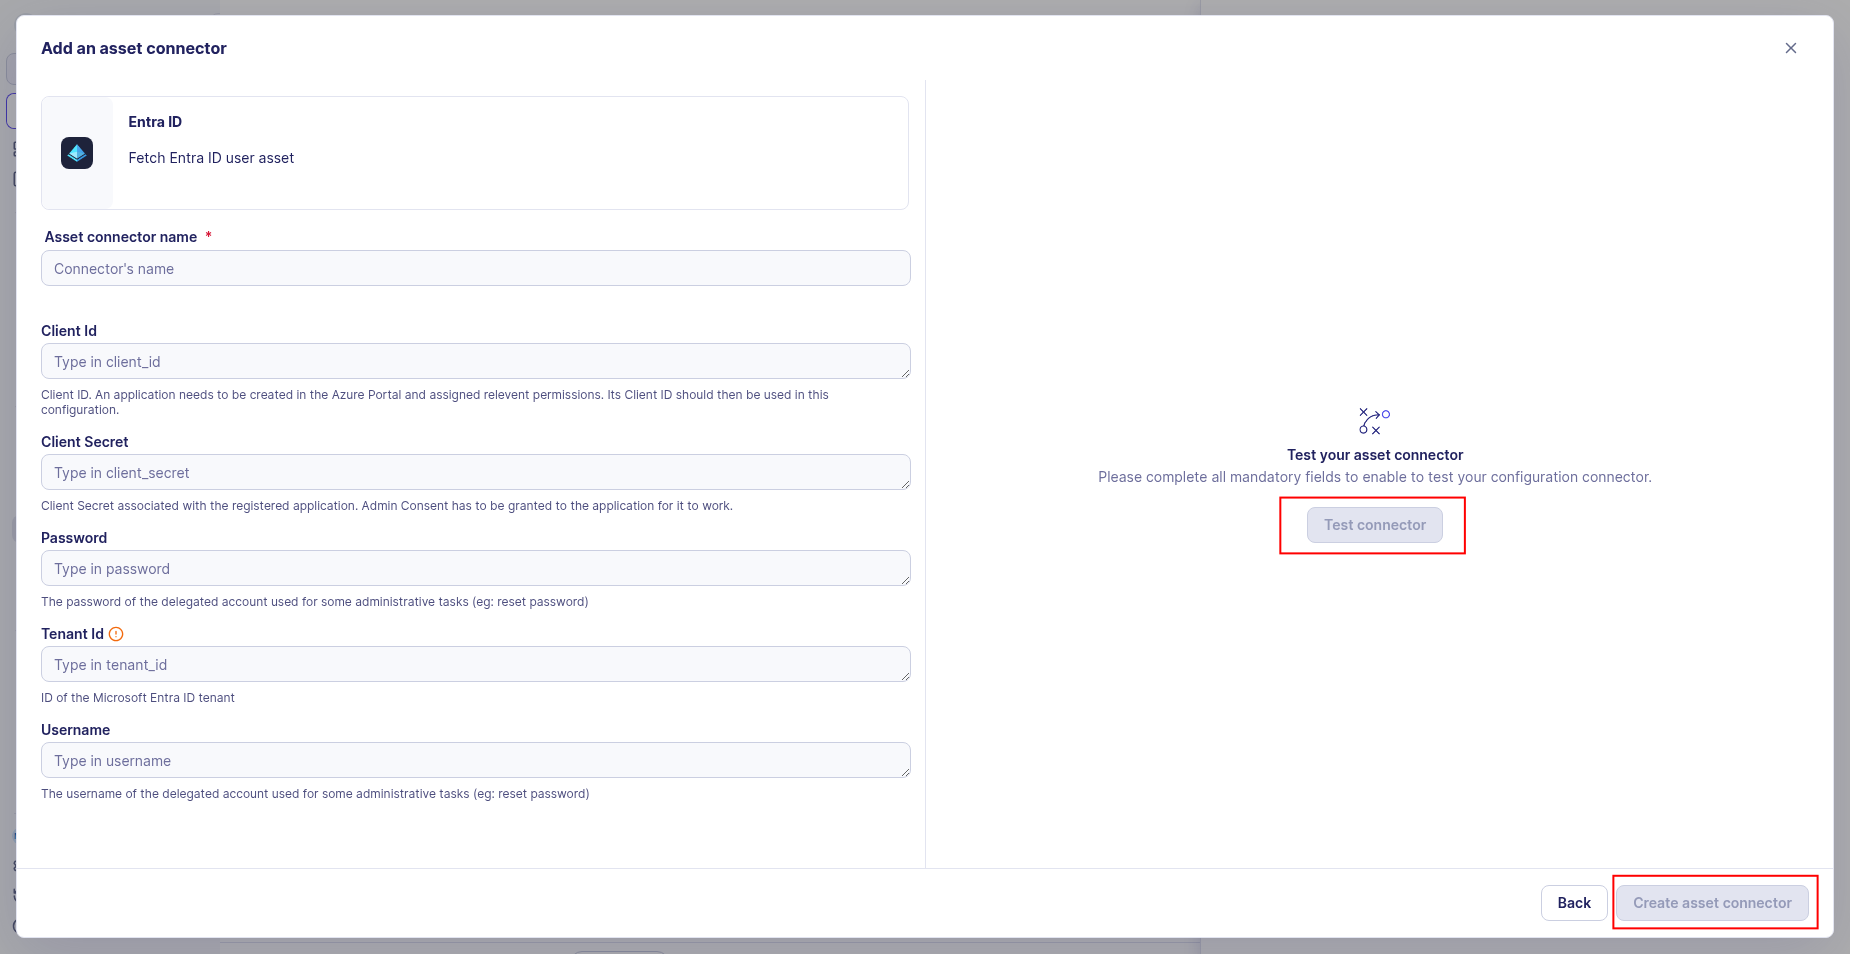
-
Click the Create asset connector button.
OCSF Mapping for Microsoft Entra ID Users
OCSF Class: user_inventory_info
Class UID: 5003
Information Collected
The Microsoft Entra ID Users fetches comprehensive information and transforms it into the OCSF (Open Cybersecurity Schema Framework) format for standardized security monitoring and asset management.
API Response Examples
Entra ID Active User
Microsoft Entra ID user with console access and group membership
{
  "id": "a1b2c3d4-e5f6-7890-abcd-ef1234567890",
  "userPrincipalName": "mary.jones@example.com",
  "displayName": "Mary Jones",
  "givenName": "Mary",
  "surname": "Jones",
  "mail": "mary.jones@example.com",
  "jobTitle": "Financial Analyst",
  "department": "Finance",
  "officeLocation": "New York, NY",
  "mobilePhone": "+1-555-234-5678",
  "businessPhones": ["+1-555-234-5678"],
  "createdDateTime": "2020-06-04T10:00:00Z",
  "lastSignInDateTime": "2025-08-26T09:30:00Z",
  "accountEnabled": true,
  "userType": "Member",
  "employeeId": "EMP456",
  "onPremisesUserPrincipalName": "mary.jones@example.com",
  "onPremisesSyncEnabled": true,
  "memberOf": [
    "Finance Users",
    "All Users"
  ],
  "assignedLicenses": [
    {
      "skuId": "6fd2c87f-bc8f-4e6d-8d55-d453c968c64f"
    }
  ]
}
Entra ID Disabled User
Microsoft Entra ID user with account disabled
{
  "id": "b2c3d4e5-f6a7-8901-bcde-f12345678901",
  "userPrincipalName": "robert.smith@example.com",
  "displayName": "Robert Smith",
  "givenName": "Robert",
  "surname": "Smith",
  "mail": "robert.smith@example.com",
  "jobTitle": "Senior Software Engineer",
  "department": "Engineering",
  "officeLocation": "San Francisco, CA",
  "mobilePhone": "+1-555-345-6789",
  "businessPhones": ["+1-555-345-6789"],
  "createdDateTime": "2020-06-04T10:00:00Z",
  "lastSignInDateTime": "2025-06-10T14:00:00Z",
  "accountEnabled": false,
  "userType": "Member",
  "employeeId": "EMP789",
  "onPremisesUserPrincipalName": "robert.smith@example.com",
  "onPremisesSyncEnabled": true,
  "memberOf": [
    "Engineering Users"
  ],
  "assignedLicenses": []
}
Data Mapping Table
The following table shows how source data is mapped to OCSF model fields:
| Source Field | OCSF Field Path | Description | Data Type | Logic |
|---|---|---|---|---|
id |
user.uid |
Microsoft Entra ID user unique identifier (UUID) | string |
Direct mapping of Microsoft Entra ID user UUID |
userPrincipalName |
user.name |
User principal name (UPN) - email-like format | string |
Direct mapping of user principal name |
displayName |
user.full_name |
User display name | string |
Direct mapping of display name |
userPrincipalName |
user.account.uid |
Entra ID account identifier (UPN) | string |
Direct mapping of user principal name |
userPrincipalName |
user.account.name |
Account username (UPN) | string |
Direct mapping of user principal name |
static: Entra ID |
user.account.type |
Account type identifier | string |
Always 'Entra ID' |
static: 41 |
user.account.type_id |
OCSF account type ID | integer |
Always 41 for Entra ID account type |
mail |
user.email_addr |
User email address | string |
Direct mapping of email address |
mobilePhone |
user.phone |
Mobile phone number | string |
Direct mapping of mobile phone |
businessPhones | first |
user.work_phone |
Work phone number | string |
Extract first business phone number |
department |
user.department |
User department | string |
Direct mapping of department attribute |
jobTitle |
user.job_title |
User job title | string |
Direct mapping of job title |
employeeId |
user.employee_id |
Employee ID | string |
Direct mapping of employee ID |
officeLocation |
user.office_location |
Office location | string |
Direct mapping of office location |
accountEnabled |
user.is_enabled |
Whether user account is enabled | boolean |
Direct mapping of account enabled status |
memberOf | length > 0 |
user.has_groups |
Whether user belongs to any groups | boolean |
true if user is member of any group, false otherwise |
memberOf |
user.groups |
Group memberships | array[object] |
Create Group objects with group name as uid and name |
assignedLicenses | length > 0 |
user.has_licenses |
Whether user has assigned licenses | boolean |
true if user has assigned licenses, false otherwise |
assignedLicenses | length |
user.licenses_count |
Number of assigned licenses | integer |
Count of assigned licenses |
onPremisesUserPrincipalName |
user.on_premises_upn |
On-premises user principal name | string |
Direct mapping of on-premises UPN |
onPremisesSyncEnabled |
user.is_synced |
Whether user is synced from on-premises | boolean |
Direct mapping of on-premises sync status |
createdDateTime |
user.created_time |
User creation timestamp (Unix epoch) | integer |
Convert ISO 8601 to Unix epoch |
lastSignInDateTime |
user.last_login_time |
Last sign-in timestamp (Unix epoch) | integer |
Convert ISO 8601 to Unix epoch; null if never signed in |
createdDateTime |
time |
OCSF event timestamp (user discovery time) | integer |
Convert ISO 8601 to Unix epoch for OCSF event timestamp |
static: 2 |
activity_id |
OCSF activity ID for inventory collection | integer |
Always 2 for 'Collect' activity |
static: Collect |
activity_name |
OCSF activity name | string |
Always 'Collect' |
static: Discovery |
category_name |
OCSF category name | string |
Always 'Discovery' |
static: 5 |
category_uid |
OCSF category UID | integer |
Always 5 for Discovery category |
static: User Inventory Info |
class_name |
OCSF class name | string |
Always 'User Inventory Info' |
static: 5003 |
class_uid |
OCSF class UID | integer |
Always 5003 for User Inventory Info |
computed: 500300 + activity_id |
type_uid |
OCSF type UID | integer |
Base 500300 + activity_id (2 = 500302) |
computed: class_name + ': ' + activity_name |
type_name |
OCSF type name | string |
Concatenate 'User Inventory Info: Collect' |
static: Informational |
severity |
Event severity level | string |
Always 'Informational' for inventory events |
static: 1 |
severity_id |
OCSF severity ID | integer |
Always 1 for Informational severity |
static: Microsoft Entra ID |
metadata.product.name |
Source product name | string |
Always 'Microsoft Entra ID' |
static: 1.6.0 |
metadata.version |
OCSF schema version | string |
Fixed OCSF schema version |
accountEnabled |
enrichments[0].data.is_enabled |
Whether user account is enabled | boolean |
Direct mapping of account enabled status |
lastSignInDateTime |
enrichments[0].data.last_sign_in |
Last sign-in timestamp (Unix epoch) | integer |
Convert ISO 8601 to Unix timestamp; return null if never signed in |
userType |
enrichments[0].data.user_type |
User type classification | string |
Direct mapping of user type (Member, Guest, etc.) |
assignedLicenses | length |
enrichments[0].data.assigned_licenses_count |
Number of assigned Microsoft 365 licenses | integer |
Count of assigned licenses |
static: access_control |
enrichments[0].name |
Enrichment object name | string |
Always 'access_control' for Entra ID enrichment type |
static: entra_id |
enrichments[0].value |
Enrichment object value | string |
Always 'entra_id' for Entra ID user access enrichment |
OCSF Model Structure
User Inventory Info: Collect
Transformed Entra ID user to OCSF User Inventory Info event
{
  "activity_id": 2,
  "activity_name": "Collect",
  "category_name": "Discovery",
  "category_uid": 5,
  "class_name": "User Inventory Info",
  "class_uid": 5003,
  "type_name": "User Inventory Info: Collect",
  "type_uid": 500302,
  "severity": "Informational",
  "severity_id": 1,
  "time": 1591234567,
  "metadata": {
    "product": {
      "name": "Microsoft Entra ID"
    },
    "version": "1.6.0"
  },
  "user": {
    "uid": "a1b2c3d4-e5f6-7890-abcd-ef1234567890",
    "name": "mary.jones@example.com",
    "full_name": "Mary Jones",
    "email_addr": "mary.jones@example.com",
    "is_enabled": true,
    "department": "Finance",
    "job_title": "Financial Analyst",
    "employee_id": "EMP456",
    "office_location": "New York, NY",
    "phone": "+1-555-234-5678",
    "work_phone": "+1-555-234-5678",
    "is_synced": true,
    "on_premises_upn": "mary.jones@example.com",
    "created_time": 1591234567,
    "last_login_time": 1691230000,
    "has_groups": true,
    "has_licenses": true,
    "licenses_count": 2,
    "account": {
      "uid": "mary.jones@example.com",
      "name": "mary.jones@example.com",
      "type": "Entra ID",
      "type_id": 41
    },
    "groups": [
      {
        "uid": "Finance Users",
        "name": "Finance Users"
      },
      {
        "uid": "All Users",
        "name": "All Users"
      }
    ]
  },
  "enrichments": [
    {
      "name": "access_control",
      "value": "entra_id",
      "data": {
        "is_enabled": true,
        "last_sign_in": 1691230000,
        "user_type": "Member",
        "assigned_licenses_count": 2
      }
    }
  ]
}