Playbooks On-premises
Our clients may find it necessary to execute Playbook actions within a local network that remains isolated from external internet access or rejects inbound connections. To meet this particular need, we enable users to select actions they want to perform on their local network directly from the Playbooks' user interface.
Clients must undertake a short installation process to harness the full potential of this security-enhancing feature. This involves installing our dedicated agent and Docker onto a Linux machine within their local network. The meticulous setup ensures that Playbook actions can be executed with the utmost reliability and security, maintaining the integrity of the local network environment.
Below, we provide detailed instructions on how to accomplish the installation process.
Warning
The Playbook runner supports only action, not trigger, execution on-premises.
Prerequisites
Host requirements
- 16G RAM
- 150G HD
- 2 CPU minimum (4 CPU recommended)
Supported OS versions
Playbooks On-prem are designed to support Linux distributions based on kernel version 3.10 or later. Here's a non-exhaustive list of supported distributions:
- Ubuntu 14.04 and newer
- Debian 8 and newer
- CentOS 7 and newer
- Redhat 7 and newer
Docker
Playbooks On-prem rely on docker to execute actions. For instructions on how to install Docker, see official installation instructions.
podman
In certain Linux distributions, such as RHEL and CentOS, podman may come pre-installed, potentially preventing dockerfrom working correctly.
Plus, podman can also inadvertently intercept and execute docker commands if the podman-docker package is installed.
Because of this, the playbook runner agent requires the presence of both the Docker client and the Docker engine.
To uninstall podman and resolve any compatibility issues, follow the instructions below:
-
Remove packages
sudo yum remove buildah skopeo podman containers-common atomic-registries docker container-tools -
Remove any left-over artifacts and files
sudo rm -rf /etc/containers/* /var/lib/containers/* /etc/docker /etc/subuid* /etc/subgid* -
Delete any associated container storage
cd ~ && rm -rf /.local/share/containers/
Allowed domains
To ensure a bug-free installation, the Sekoia Endpoint Agent must be able to communicate with several external domains:
-
To pull module images:
- ghcr.io
- githubusercontent.com
-
To send execution results and store files:
- sekoia.io
- app.sekoia.io
- api.sekoia.io
- minio-symphony.prod.sekoia.io
- ...
Note
The domains listed above apply to the FRA1 region.
For other regions, the agent will communicate with region-specific endpoints (e.g., app.fra2.sekoia.io, api.fra2.sekoia.io for FRA2 region).
The required domains for your region are displayed during the playbook runner installation in the Sekoia.io interface.
Testing the prerequisites
We've prepared a Docker image to facilitate the validation process and ensure the environment is properly configured for agent installation.
To initiate this validation, open a terminal and execute the following command:
docker run ghcr.io/sekoia-io/hello-sekoia:latest
This command will initiate the image download, effectively verifying whether the host system can successfully access the Docker registry and establish connectivity with Sekoia.io.
Example of the expected output (FRA1 region):
Checking container runs in Docker ... OK
Checking connectivity with Sekoia.io APIs ...
- Checking app.sekoia.io ... OK
- Checking api.sekoia.io ... OK
Checking connectivity with the object storage ... OK
Tip
The -e option can be passed to the docker command to specify:
- The region:
-e region=<region>(e.g.,-e region=mco1for MCO1 region) - Proxy information:
-e https_proxy=<proxy_url>
Tip
Learn more about region and code in our dedicated article.
Playbook runners
A playbook runner is a local relay that launches playbook actions on a local network. It can be used with any action in Sekoia.io playbooks.
Create a playbook runner
To create a playbook runner, follow these steps:
- On the playbooks listing page, select the
Playbook runnersbutton in the upper-right corner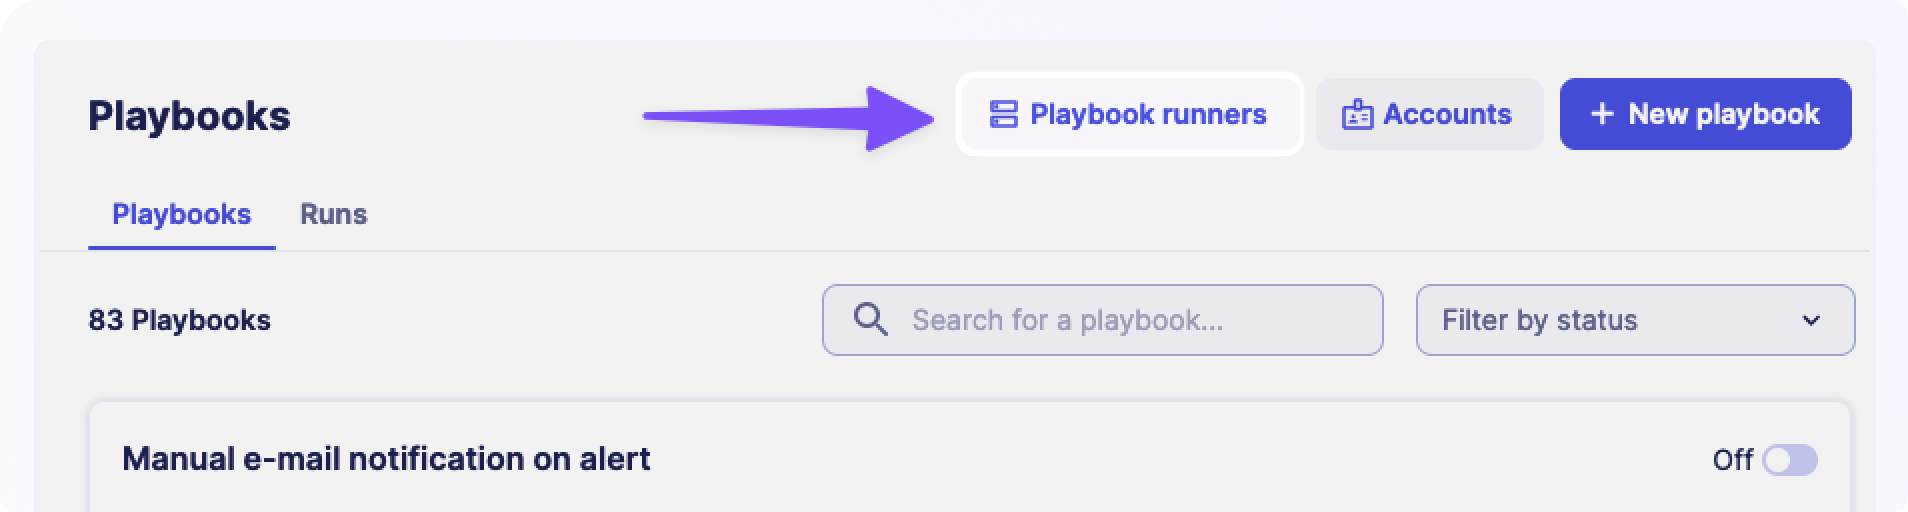
- On the playbook runners page, select
+ Set up a playbook runneror+ Playbook runner - Name your playbook runner
- Follow the instructions to install the playbook runner on your machine
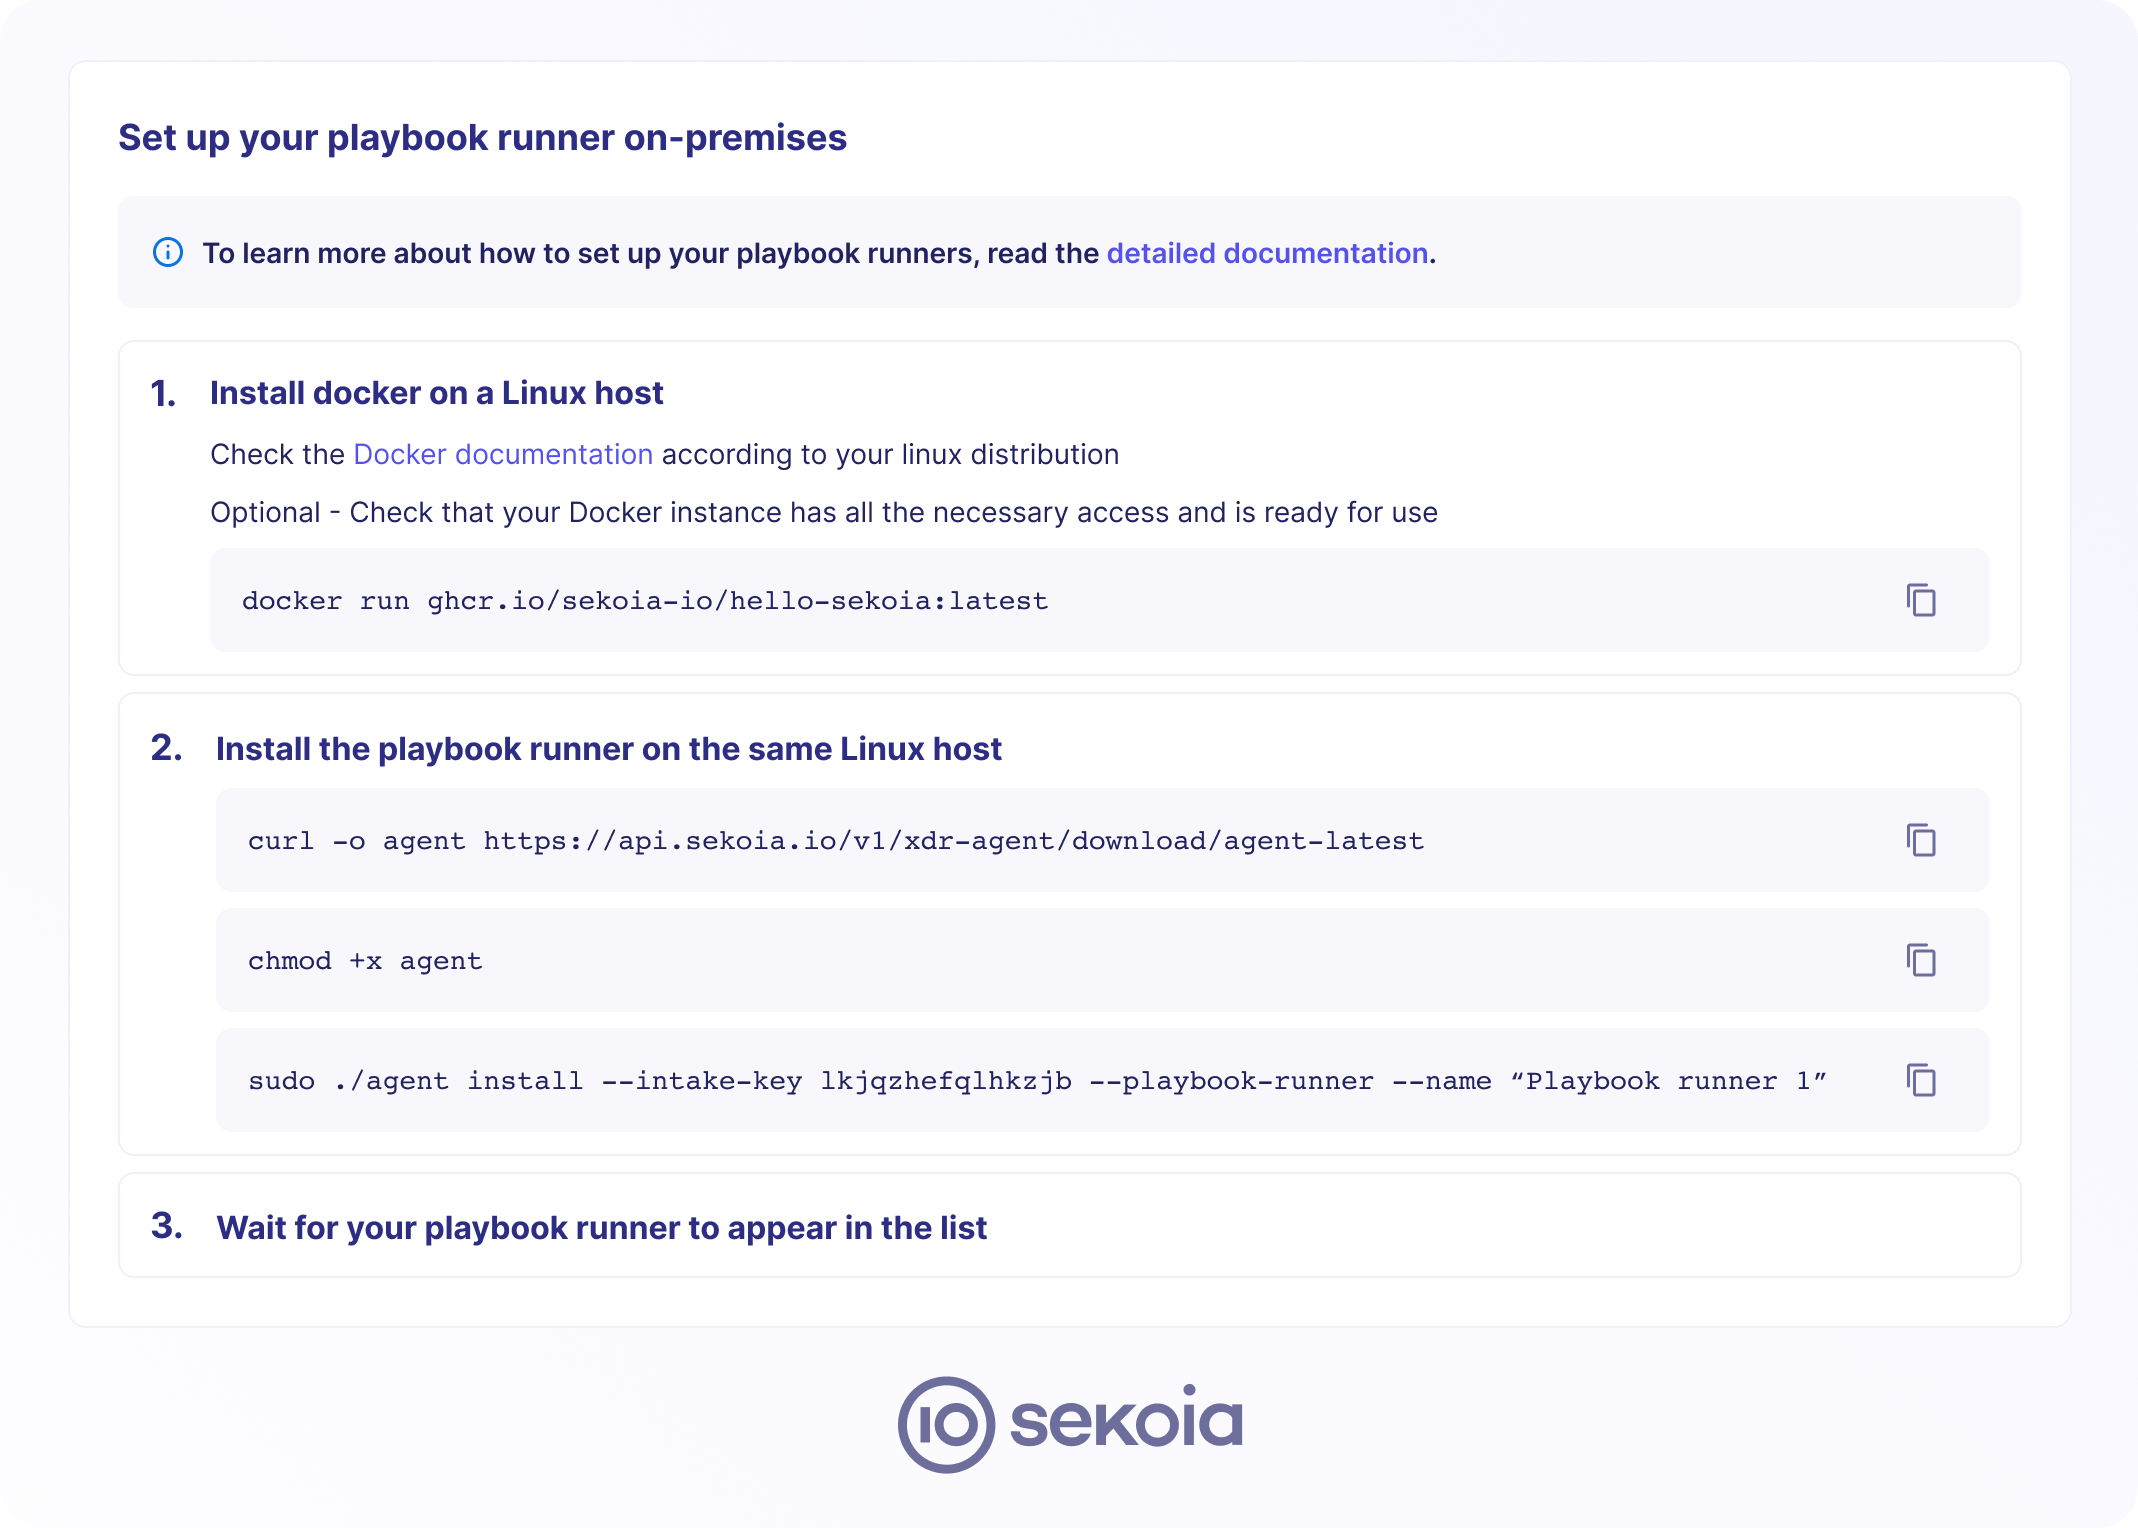
- Once the playbook runner is installed, you can leave the instructions by selecting "Back to playbook runners"
Your newly created playbook runner should now appear in the list. It will also be shown when configuring any playbook action.
Tip
To specify a region when installing the runner, add the --region argument to the installation command.
Tip
Learn more about region and code in our dedicated article.
Use a runner in a playbook action
Playbook runners can be used in any action in the playbook catalog. You can add them in the configuration panel that is shown when selecting an action in the playbook.
To use a playbook runner for a specific action, follow these steps:
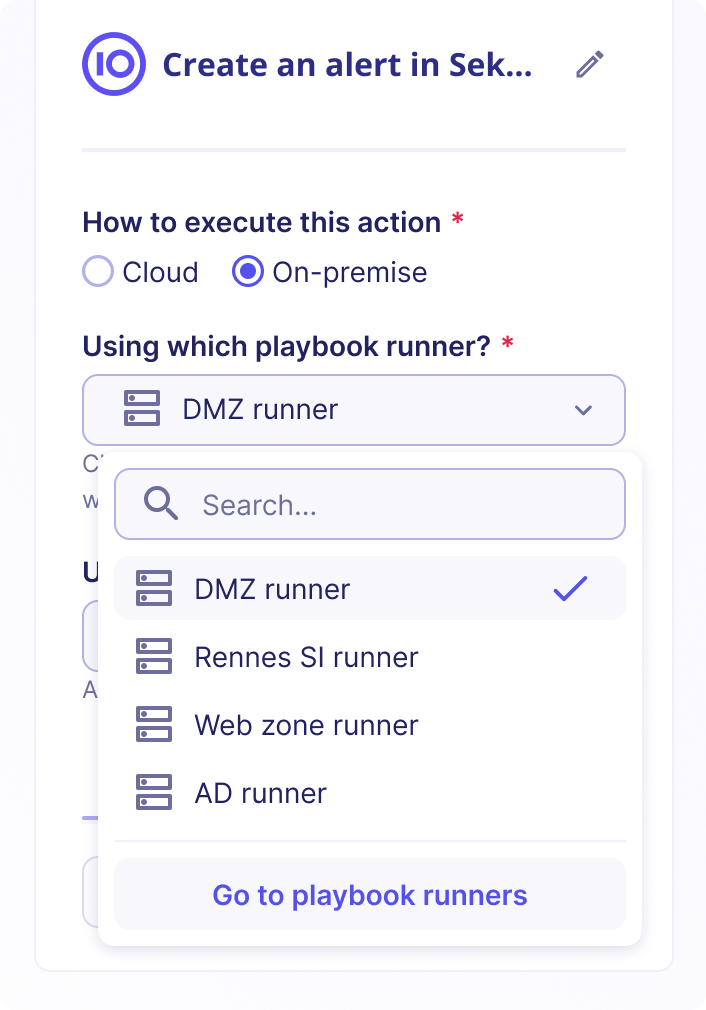
- Go to a playbook and select the action that should be executed on-premises
- Open the configuration sidebar for this action and change "How to execute this action" to "On-premises"
- In the "Which playbook runner" section, select the runner you want to use to execute this action
- After selecting the playbook runner and completing the configuration, save the playbook
Proxy support
The playbook runner can use a proxy server when executing actions if needed.
If you want to enable this feature, edit the configuration file at /etc/endpoint-agent/config.yaml and add the following line:
HTTPProxyURL: "<PROXY_URL>"
The proxy URL should follow the format http://user:pass@host:port.
It's also possible to specify a list of domains that shouldn't use the proxy:
NoProxyDomains:
  - 127.0.0.1
  - localhost
Once the configuration is changed, restart the agent by running the following command:
sudo systemctl restart SEKOIAEndpointAgent.service
Alternatively, if those variables are not set, the agent will check for the env variables http_proxy, https_proxy, all_proxy, and no_proxy on the host and forward them to the running actions.
Custom CA bundle
Sometimes, the service we contact has a TLS certificate signed by a custom Certification Authority.
To avoid errors during the TLS certificate validation step, specify the path to a CA bundle containing a list of trusted certificates.
To enable this feature, follow these steps:
-
Edit the configuration file at
/etc/endpoint-agent/config.yamland add the following line:CABundlePath: "path/to/bundle/cacert.pem"Tip
The bundle must contain trusted CA certificates authorized to communicate with Sekoia.io.
Bundle format example
The bundle usually contains a list of PEM-encoded certificates to trust, with optional comment lines starting with
#. Here's an example of the content of such a bundle:# Issuer: CN=GlobalSign Root CA O=GlobalSign nv-sa OU=Root CA # Subject: CN=GlobalSign Root CA O=GlobalSign nv-sa OU=Root CA # Label: "GlobalSign Root CA" # Serial: 4835703278459707669005204 # MD5 Fingerprint: 3e:45:52:15:09:51:92:e1:b7:5d:37:9f:b1:87:29:8a # SHA1 Fingerprint: b1:bc:96:8b:d4:f4:9d:62:2a:a8:9a:81:f2:15:01:52:a4:1d:82:9c # SHA256 Fingerprint: eb:d4:10:40:e4:bb:3e:c7:42:c9:e3:81:d3:1e:f2:a4:1a:48:b6:68:5c:96:e7:ce:f3:c1:df:6c:d4:33:1c:99 -----BEGIN CERTIFICATE----- MIIDdTCCAl2gAwIBAgILBAAAAAABFUtaw5QwDQYJKoZIhvcNAQEFBQAwVzELMAkG A1UEBhMCQkUxGTAXBgNVBAoTEEdsb2JhbFNpZ24gbnYtc2ExEDAOBgNVBAsTB1Jv b3QgQ0ExGzAZBgNVBAMTEkdsb2JhbFNpZ24gUm9vdCBDQTAeFw05ODA5MDExMjAw MDBaFw0yODAxMjgxMjAwMDBaMFcxCzAJBgNVBAYTAkJFMRkwFwYDVQQKExBHbG9i YWxTaWduIG52LXNhMRAwDgYDVQQLEwdSb290IENBMRswGQYDVQQDExJHbG9iYWxT aWduIFJvb3QgQ0EwggEiMA0GCSqGSIb3DQEBAQUAA4IBDwAwggEKAoIBAQDaDuaZ jc6j40+Kfvvxi4Mla+pIH/EqsLmVEQS98GPR4mdmzxzdzxtIK+6NiY6arymAZavp xy0Sy6scTHAHoT0KMM0VjU/43dSMUBUc71DuxC73/OlS8pF94G3VNTCOXkNz8kHp 1Wrjsok6Vjk4bwY8iGlbKk3Fp1S4bInMm/k8yuX9ifUSPJJ4ltbcdG6TRGHRjcdG snUOhugZitVtbNV4FpWi6cgKOOvyJBNPc1STE4U6G7weNLWLBYy5d4ux2x8gkasJ U26Qzns3dLlwR5EiUWMWea6xrkEmCMgZK9FGqkjWZCrXgzT/LCrBbBlDSgeF59N8 9iFo7+ryUp9/k5DPAgMBAAGjQjBAMA4GA1UdDwEB/wQEAwIBBjAPBgNVHRMBAf8E BTADAQH/MB0GA1UdDgQWBBRge2YaRQ2XyolQL30EzTSo//z9SzANBgkqhkiG9w0B AQUFAAOCAQEA1nPnfE920I2/7LqivjTFKDK1fPxsnCwrvQmeU79rXqoRSLblCKOz yj1hTdNGCbM+w6DjY1Ub8rrvrTnhQ7k4o+YviiY776BQVvnGCv04zcQLcFGUl5gE 38NflNUVyRRBnMRddWQVDf9VMOyGj/8N7yy5Y0b2qvzfvGn9LhJIZJrglfCm7ymP AbEVtQwdpf5pLGkkeB6zpxxxYu7KyJesF12KwvhHhm4qxFYxldBniYUr+WymXUad DKqC5JlR3XC321Y9YeRq4VzW9v493kHMB65jUr9TU/Qr6cf9tveCX4XSQRjbgbME HMUfpIBvFSDJ3gyICh3WZlXi/EjJKSZp4A== -----END CERTIFICATE----- # Issuer: CN=Entrust.net Certification Authority (2048) O=Entrust.net OU=www.entrust.net/CPS_2048 incorp. by ref. (limits liab.)/(c) 1999 Entrust.net Limited # Subject: CN=Entrust.net Certification Authority (2048) O=Entrust.net OU=www.entrust.net/CPS_2048 incorp. by ref. (limits liab.)/(c) 1999 Entrust.net Limited # Label: "Entrust.net Premium 2048 Secure Server CA" # Serial: 946069240 # MD5 Fingerprint: ee:29:31:bc:32:7e:9a:e6:e8:b5:f7:51:b4:34:71:90 # SHA1 Fingerprint: 50:30:06:09:1d:97:d4:f5:ae:39:f7:cb:e7:92:7d:7d:65:2d:34:31 # SHA256 Fingerprint: 6d:c4:71:72:e0:1c:bc:b0:bf:62:58:0d:89:5f:e2:b8:ac:9a:d4:f8:73:80:1e:0c:10:b9:c8:37:d2:1e:b1:77 -----BEGIN CERTIFICATE----- MIIEKjCCAxKgAwIBAgIEOGPe+DANBgkqhkiG9w0BAQUFADCBtDEUMBIGA1UEChML RW50cnVzdC5uZXQxQDA+BgNVBAsUN3d3dy5lbnRydXN0Lm5ldC9DUFNfMjA0OCBp bmNvcnAuIGJ5IHJlZi4gKGxpbWl0cyBsaWFiLikxJTAjBgNVBAsTHChjKSAxOTk5 IEVudHJ1c3QubmV0IExpbWl0ZWQxMzAxBgNVBAMTKkVudHJ1c3QubmV0IENlcnRp ZmljYXRpb24gQXV0aG9yaXR5ICgyMDQ4KTAeFw05OTEyMjQxNzUwNTFaFw0yOTA3 MjQxNDE1MTJaMIG0MRQwEgYDVQQKEwtFbnRydXN0Lm5ldDFAMD4GA1UECxQ3d3d3 LmVudHJ1c3QubmV0L0NQU18yMDQ4IGluY29ycC4gYnkgcmVmLiAobGltaXRzIGxp YWIuKTElMCMGA1UECxMcKGMpIDE5OTkgRW50cnVzdC5uZXQgTGltaXRlZDEzMDEG A1UEAxMqRW50cnVzdC5uZXQgQ2VydGlmaWNhdGlvbiBBdXRob3JpdHkgKDIwNDgp MIIBIjANBgkqhkiG9w0BAQEFAAOCAQ8AMIIBCgKCAQEArU1LqRKGsuqjIAcVFmQq K0vRvwtKTY7tgHalZ7d4QMBzQshowNtTK91euHaYNZOLGp18EzoOH1u3Hs/lJBQe sYGpjX24zGtLA/ECDNyrpUAkAH90lKGdCCmziAv1h3edVc3kw37XamSrhRSGlVuX MlBvPci6Zgzj/L24ScF2iUkZ/cCovYmjZy/Gn7xxGWC4LeksyZB2ZnuU4q941mVT XTzWnLLPKQP5L6RQstRIzgUyVYr9smRMDuSYB3Xbf9+5CFVghTAp+XtIpGmG4zU/ HoZdenoVve8AjhUiVBcAkCaTvA5JaJG/+EfTnZVCwQ5N328mz8MYIWJmQ3DW1cAH 4QIDAQABo0IwQDAOBgNVHQ8BAf8EBAMCAQYwDwYDVR0TAQH/BAUwAwEB/zAdBgNV HQ4EFgQUVeSB0RGAvtiJuQijMfmhJAkWuXAwDQYJKoZIhvcNAQEFBQADggEBADub j1abMOdTmXx6eadNl9cZlZD7Bh/KM3xGY4+WZiT6QBshJ8rmcnPyT/4xmf3IDExo U8aAghOY+rat2l098c5u9hURlIIM7j+VrxGrD9cv3h8Dj1csHsm7mhpElesYT6Yf zX1XEC+bBAlahLVu2B064dae0Wx5XnkcFMXj0EyTO2U87d89vqbllRrDtRnDvV5b u/8j72gZyxKTJ1wDLW8w0B62GqzeWvfRqqgnpv55gcR5mTNXuhKwqeBCbJPKVt7+ bYQLCIt+jerXmCHG8+c8eS9enNFMFY3h7CI3zJpDC5fcgJCNs2ebb0gIFVbPv/Er fF6adulZkMV8gzURZVE= -----END CERTIFICATE----- -
Once the configuration is changed, restart the agent by running the following command:
sudo systemctl restart SEKOIAEndpointAgent.service