Prerequisites to retrieve logs from Azure to Sekoia.io
When utilizing an Azure integration with Sekoia.io, the initial step involves centralizing your logs using Event Hub in order to pull events. The following page will guide you through the process of setting up these prerequisites
Azure Event Hubs is a cloud-based event streaming platform and event ingestion service provided by Microsoft Azure. It is designed to handle large amounts of event data generated by various applications, devices, and services in real-time. Event Hubs enables you to ingest, process, and store events, logs, telemetry data, and other streaming data for further analysis, monitoring, and processing. Two ways are suggested in order to set up everything you need to forward your events on Sekoia.io.
If you are not an expert and want an easy way to configure the ressources on Azure, we recommend to use to Automatic way as it is easier to set up.
These two ways will create an Azure Event Hub and a Storage Account.
Use the template to create the ressources
To get started, click on the button below and fill the form on Azure to set up the required environment for Sekoia
Some fields must be filled in.
Project details
- Subscription: select the Azure subscription you want to use
- Resource Group: select or create a new Resource Group. A Resource Group is a container that holds related resources
Instance details
- Region: select the appropriated region
- Project Name: give a name for this project. Here is how the names of the resources will be affected by this project name
| Ressource | Name |
|---|---|
| Event Hub Namespace | <project_name>ehns |
| Event Hub | <project_name>eh |
| Shared Access Policy | <project_name>ap |
| Consumer Group | <project_name>cp |
| Storage Account | <project_name>sa |
- Event Hub Sku: Select the messaging tier for Event Hub Namespace between
Basic,StandardorPremium. We do not recommendBasicmodel due to its limitation. Please follow this Microsoft web page to get more information avec the different messaging tier. - Troughput Unit: A unit gives you up to 1 MB/s or 1,000 events per second (whichever comes first) per Event Hub Namespace. Please adapt it to your need.
- Enable Auto Inflate: When checked, the Auto-inflate feature of Event Hubs automatically scales up by increasing the number of troughput units, to meet usage needs.
- Auto Inflate Maximum Throughput Unit: When Enable Auto Inflate is checked, you can specify the maximum throughput units you allow.
- Partition Count: The number of event hub partitions. Microsoft recommends a maximum throughput of 1 MB/s per partition. Unless you plan to add more Event hubs to the Event Hub Namespace, the Partition Count and Throughput Unit variables should have the same values.
- Retention Time: How long you will keep events in the Event hub in days.
Use the output variables to create a Sekoia playbook
When the message Your deployment is complete is displayed, click on Outputs.
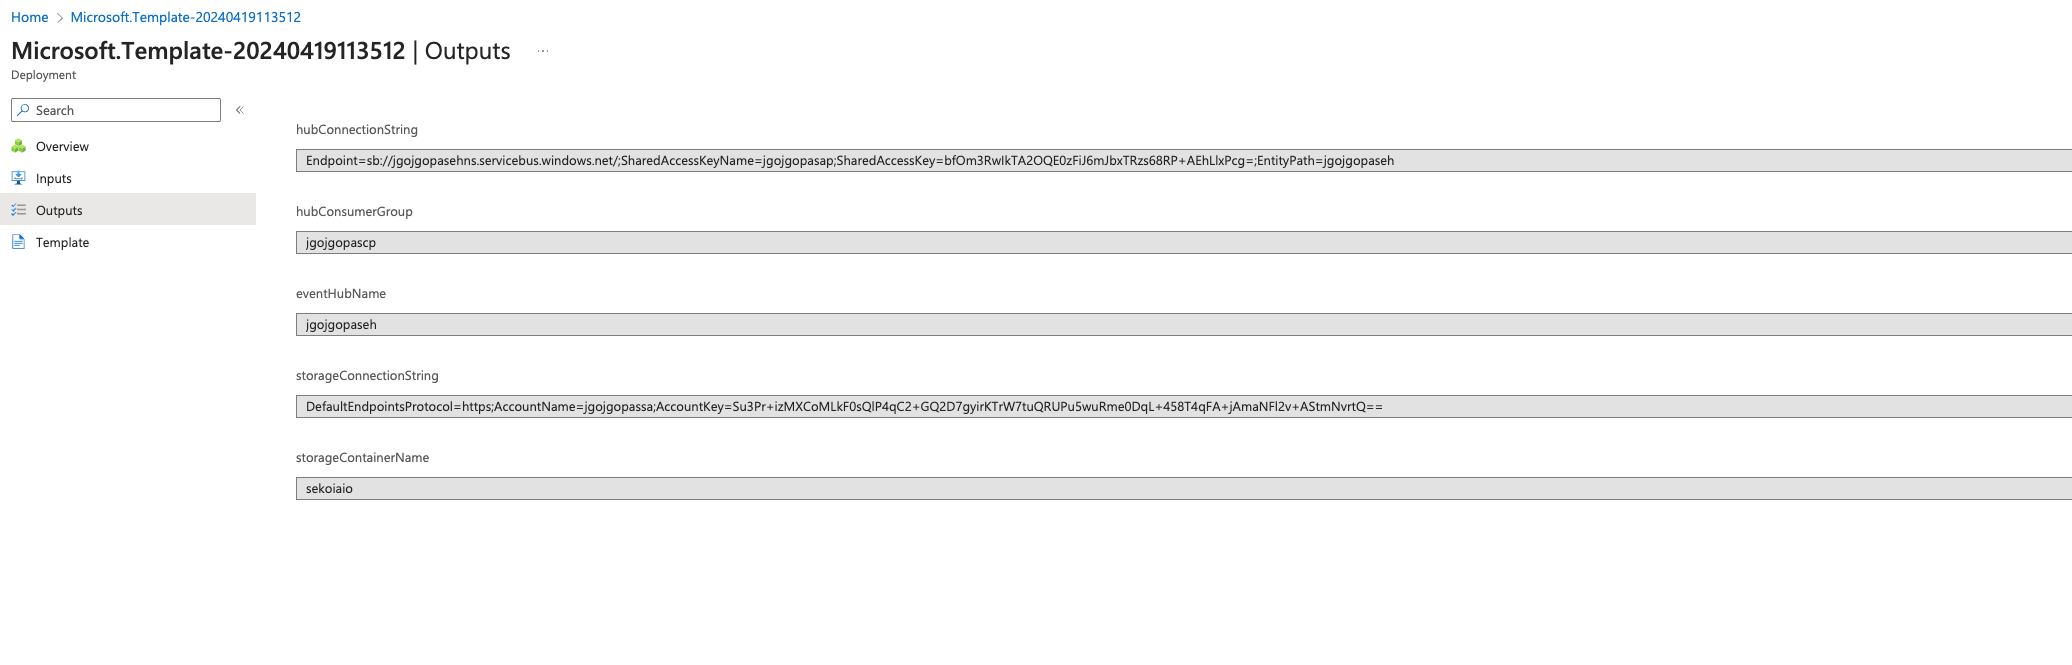
Keep these 5 pieces of information displayed carefully, it will used to configure the Trigger Configuration of the Sekoia playbook.
Overview
This setup guide will show you how to create an Event Hub manually.
Theses changes have to be made from the Azure Web Portal.
Some resources created during this procedure are needed to connect Sekoia.io to the Event Hub, you can complete the following table to save all the useful informations for later use.
| Name | Value | Description | Example |
|---|---|---|---|
| hub_name | To be completed at step 3 | Name of the Event Hub | sekoia_event_hub |
| hub_connection_string | To be completed at step 5 | Connection string–primary key | Endpoint=sb://company-eventhub.servicebus.windows.net/;SharedAccessKeyName=sekoiaio;SharedAccessKey=XXXXXX;EntityPath=sekoia_event_hub |
| hub_consumer_group | To be completed at step 6 | Name of the comsumer group | consumergroup_sekoiaio |
| storage_container_name | To be completed at step 7 | Name of your container | sekoiaio |
| storage_connection_string | To be completed at step 8 | Storage connection string | DefaultEndpointsProtocol=https;AccountName=sekoiaiocheckpoint;AccountKey=XXXXX |
As a prerequisite, you need to choose an existing Resource group, or create a new one (e.g. company-resource-group).
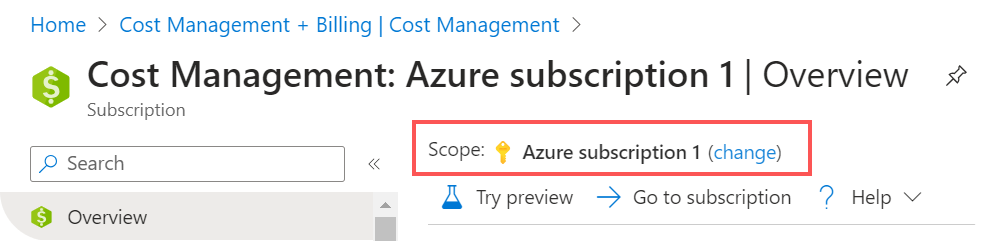
Step 1: Find your Subscription ID
- Go to: Home > Cost Management + Billing > Subscriptions.
- From there, keep the relevant “Subscription ID” that will be used along the process.
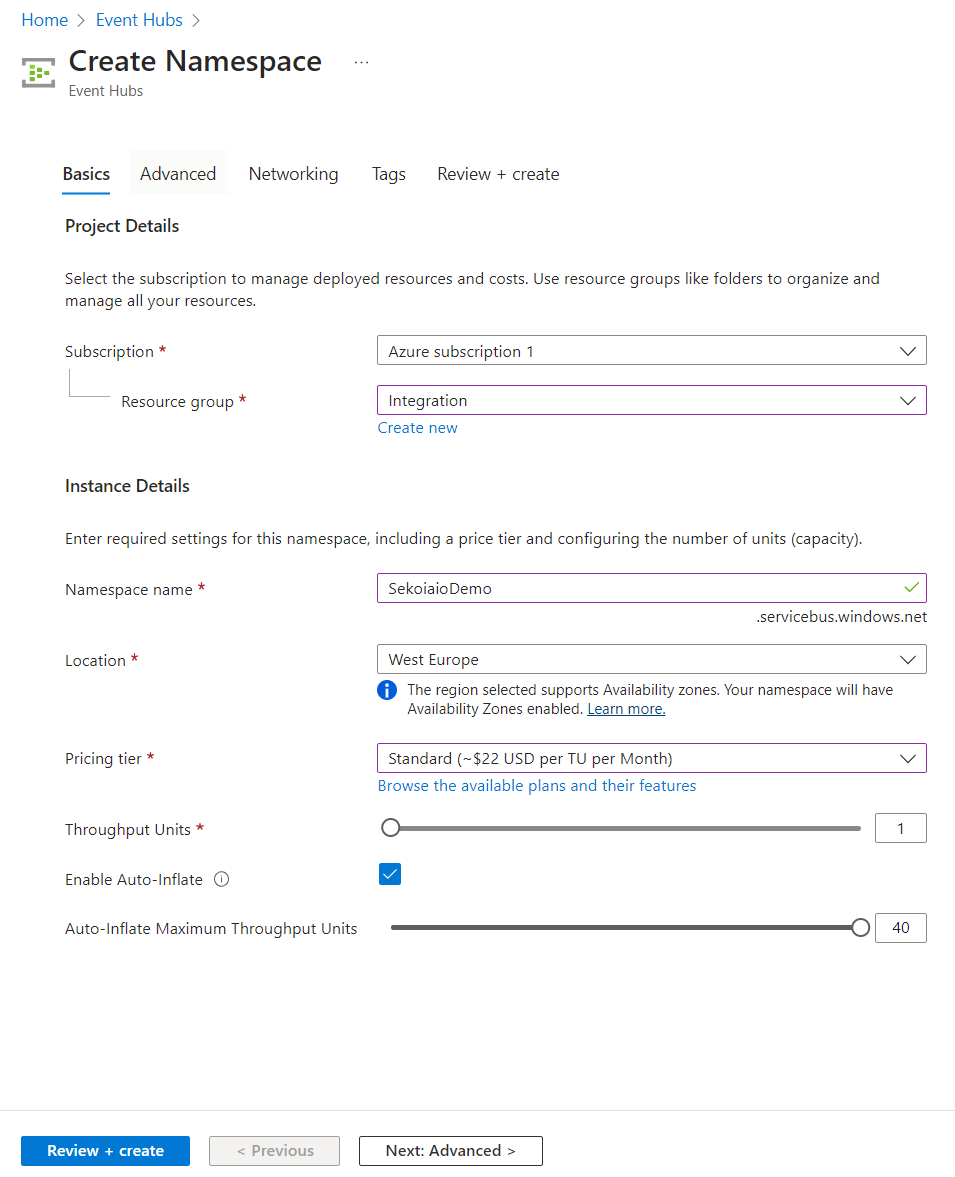
Step 2: Create Event Hub Namespace
- Navigate to Home > Event Hubs.
- Create an Event Hub Namespace.
- Select your Subscription and your Resource group. Click on create new if you want your Event Hub Namespace in a new Resource group.
- Choose a namespace name.
- Select a location based on your events location.
- Select the pricing tier plan based on your utilisation: Standard or Premimum (We don't recommend to choose the Basic plan due to its limitations.)
- Select the throughput units number based on your events, or enable the auto inflate mode:
1 throughput unit can process up to 1 MB per second or 1000 events per second (whichever comes first).
Step 3: Create Event Hub Instance
When your Event Hub Namespace is created you can create an Event Hub inside:
- Navigate to Home > Event Hubs > company-eventhubnamespace.
- Create an Event Hub.
- Select 4 as default partition count
- Select
Deleteas cleanup policy - Type 168h (7 days) as retention time
- Click
Create
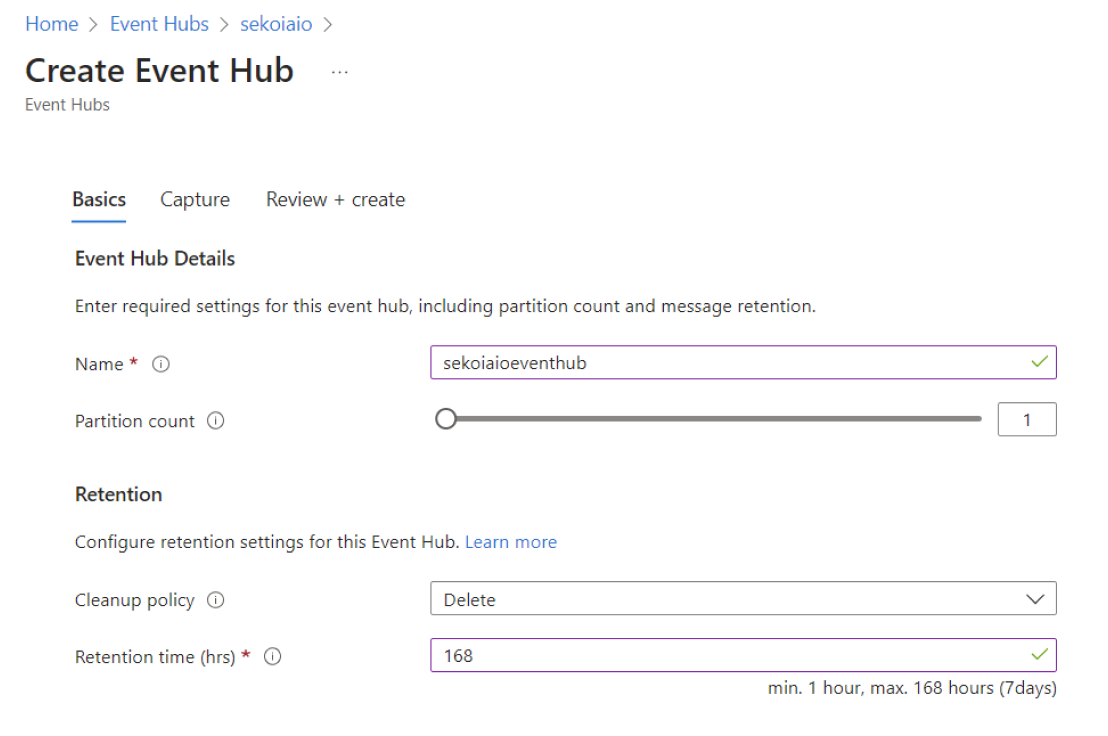
Info
Carefully store the Event Hub name that will be used for sekoia playbook configuration.
Step 4: Create “Shared Access Policies” for the Event Hub
- Navigate to Home > Event Hubs > company-eventhubnamespace > eventhubname | Shared access policies.
-
Create a policy (e.g.
sekoiaio) with the claimsListen.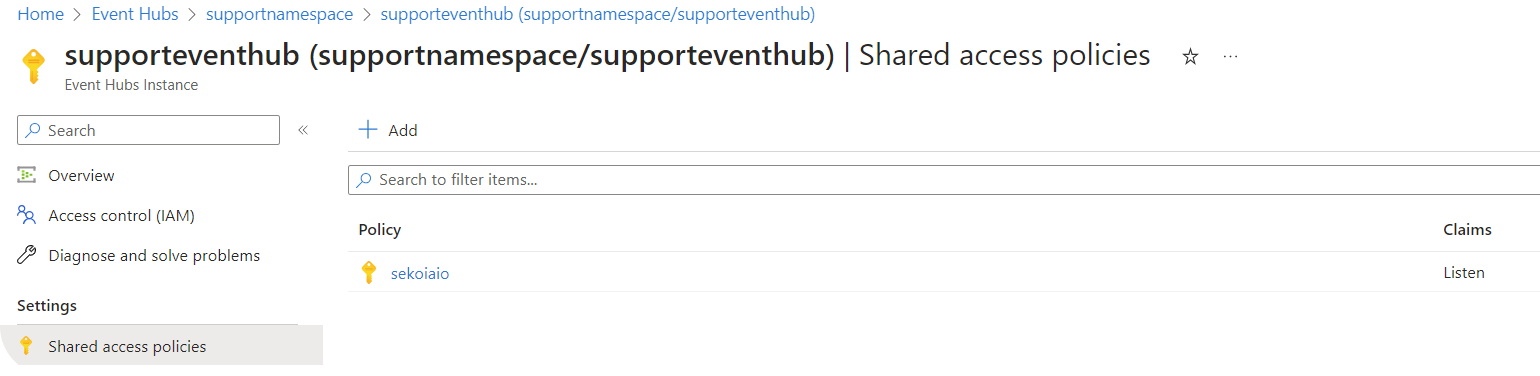
-
Once created, click on the policy.
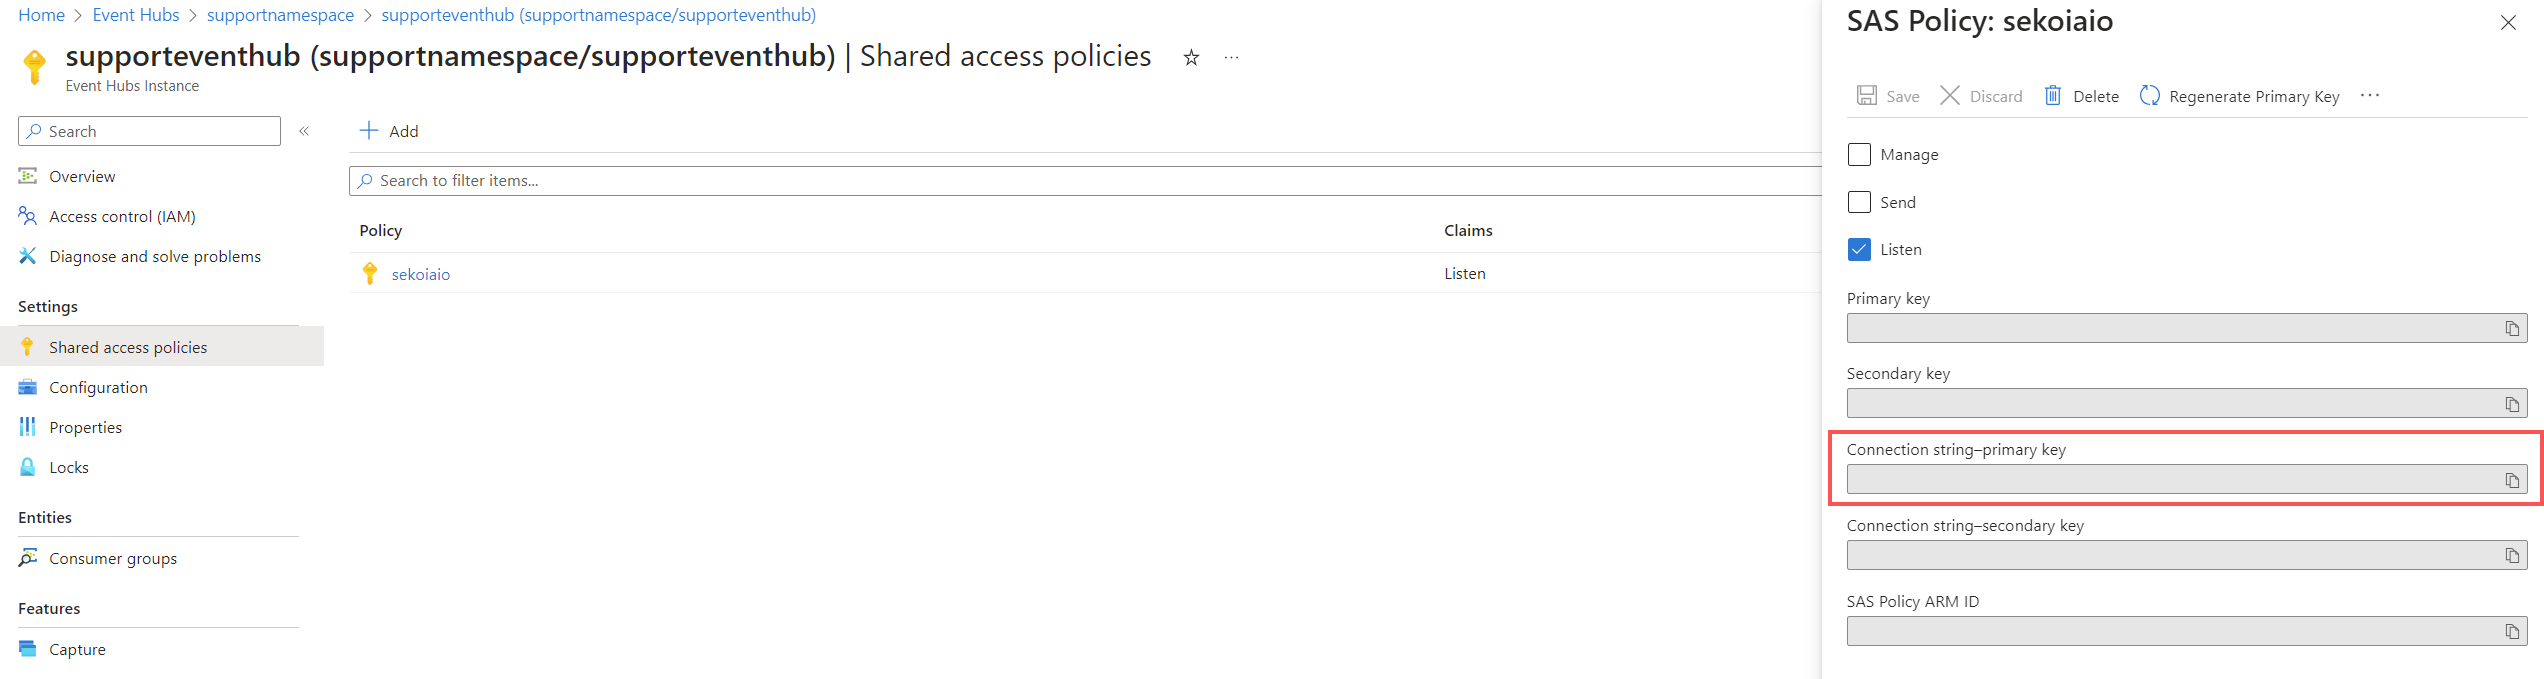
Info
Carefully store the connection string–primary key that will be used for sekoia playbook configuration.
Step 5: Create a Consumer group
- Navigate to Home > Event Hubs > company-eventhubnamespace > eventhubname | Consumer groups.
- Create a Consumer group (e.g.
consumergroup_sekoiaio).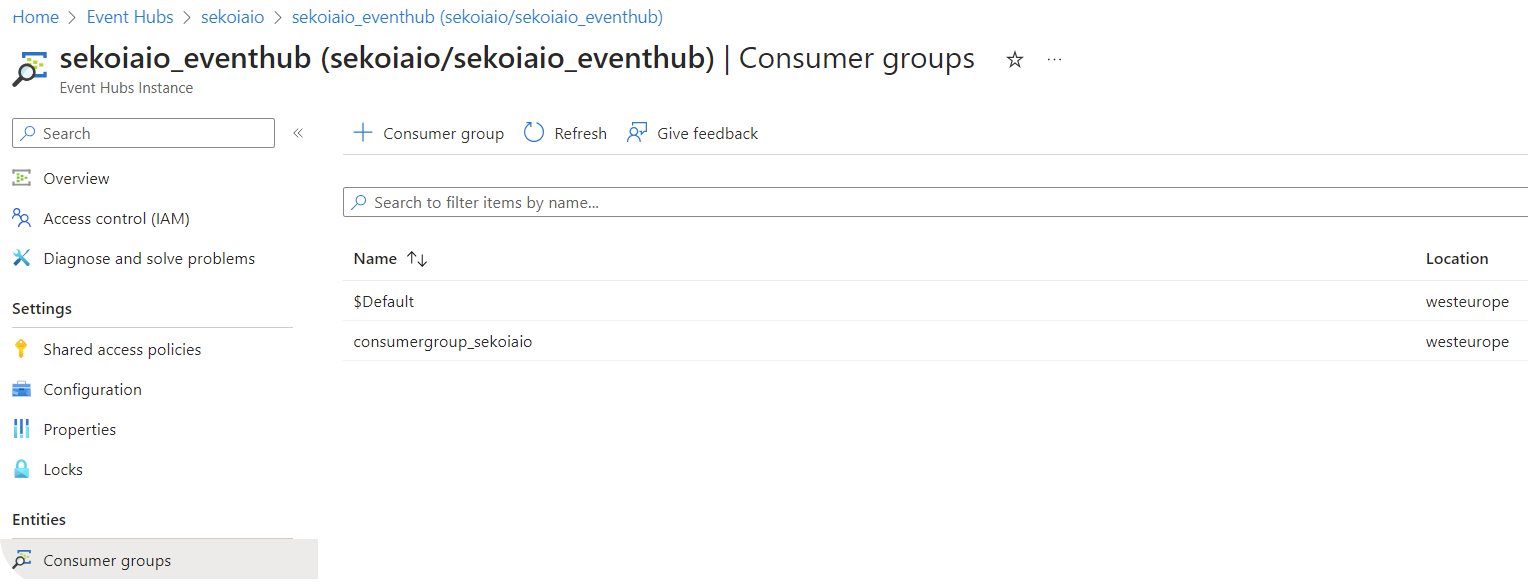
Info
Carefully store the Consumer group name that will be used for sekoia playbook configuration.
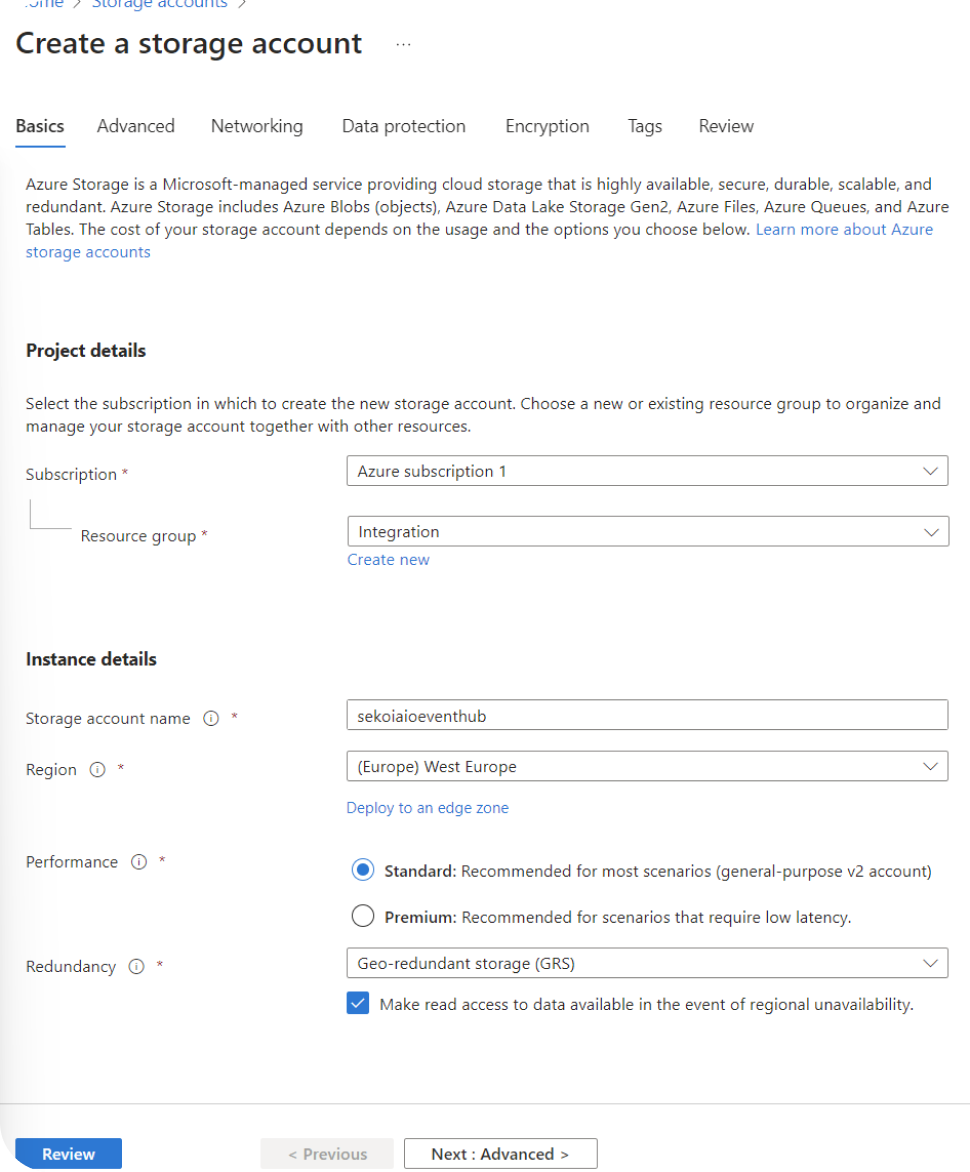
Step 6: Create a Storage Account with a container
In order to allow Sekoia.io keep track of the consumed events, the next step consists in creating a dedicated Storage account.
- Navigate to Home > Storage accounts.
- Create a Storage account.
- Select your Subscription and your Resource group.
- Choose a Storage account name.
-
Select a Region.
Info
You must choose the Region used during the Event Hub Namespace creation.
-
Select your perfomance and redundancy parameters.
Info
We advise at least the following values: - performance: standard - redundancy: Geo-Redundancy storage (GRS)
When your storage account is created you can create an container inside. 1. Navigate to Home > Storage accounts > storageaccoutname | containers. 2. Create an container.
Keep the Public Acces Level to Private.
Info
The container name should be the same as the Event Hub name. Carefully store that container name that will be used for sekoia playbook configuration.
Step 7: Retrieve Connection String
You have to retrieve the connection string from Azure Web Portal.
- Go to Home > Storage accounts > storageaccoutname | Access Keys.
- Click on "Show Keys" on the first Connection String.
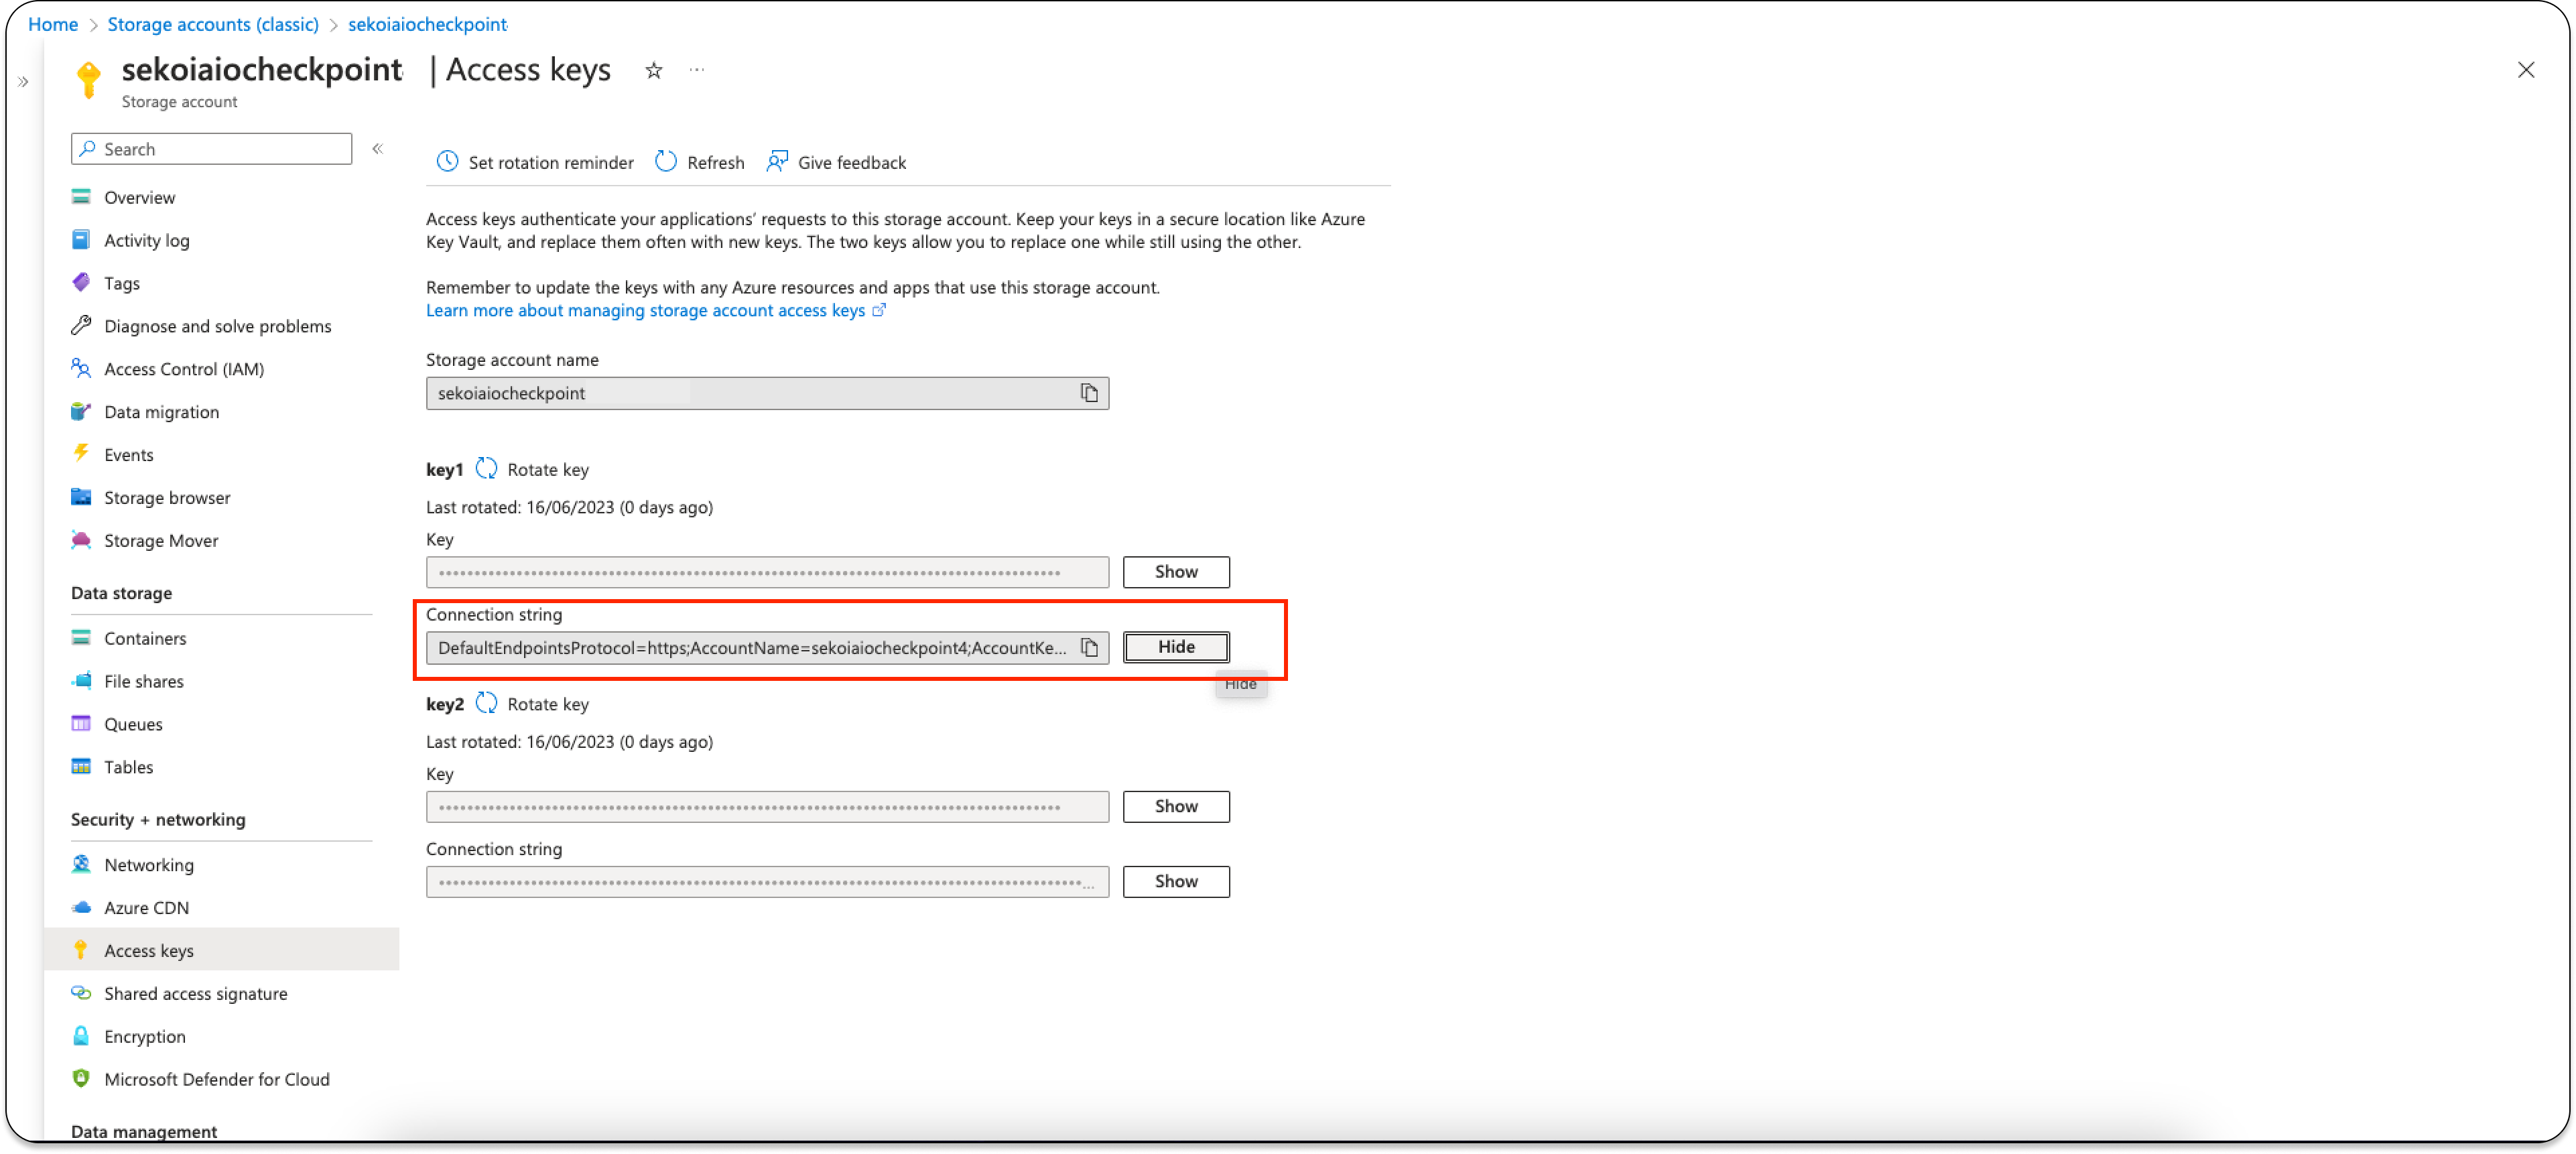
Info
Carefully store the Connection String that will be used for sekoia playbook configuration.
Further Readings